Indian Ground Turkey with Peas (Murghi Ka Keema)

Indian1

Hello everyone! Sorry for the week-long lapse between recipes, but you know, Christmas happened and I had lotsa stuff to do. Like watch It’s a Wonderful Life, play board games on Christmas Eve, finish wrapping presents and cook an entire Christmas dinner without managing to get a single picture for my blog. Then I was so exhausted from all of that that I had to spend the next three days sleeping in, reading my new books, going on runs in the fresh air, and watching an entire season of The Office on Netflix. Can you blame me? 😉

Regardless, I’m back with a deeeelicious recipe for you today! And unlike the mass amounts of sweets I’ve been posting lately (cookie dough fudge, anyone?), this is something you can actually eat for dinner! Like, real food. Food that isn’t pure butter and sugar; food that actually contains ingredients from the protein and vegetable sections of the food pyramid.

For Christmas my parents Santa bought me three cookbooks, one of which was Quick and Easy Indian Cooking. I happen to LOVE Indian food now that I’ve grown from a tiny picky eater to a…large…open-minded eater. Maybe not the large part so much…I kinda set myself up for that one. It’s true though, that I used to be a very unadventurous eater.

Example: I was 20 months old. My grandma was taking care of me, and she made up a little tray with cheese and crackers, all cut up and laid out attractively. I took one look, picked it up (which was quite a feat, considering the tray was almost as big as I was) and said, “No like. Raspbewwies, stwahbewwies, and boobewwies, pwease.” <–True story.

Anyway, I’m no longer the kid that refused to eat anything but cheese quesadillas at Mexican restaurants, pasta with butter and parmesan at Italian restaurants, and egg drop soup at Chinese restaurants. Seriously, in first grade we went out for Chinese every Friday night and every time I ordered egg drop soup. And forget about taking me to a Thai place, Greek place, or Indian place. It just wasn’t happening. But now…now…I’ve successfully become an adventurous eater! I’ll eat practically anything, not counting beets, which are my nemesis. Is my nemesis? Are my nemeses? Are my nemesi? What I’m trying to say is, I hate them.

I made this Indian Ground Turkey with Peas the day after Christmas, and it was so. good. It really tasted like it came out of an Indian restaurant! I had to splurge a little to buy two of the spices, but it was totally worth it! If you don’t have the whole spices I’m guessing you could throw in their ground versions, though I can’t vouch that the end product will be quite the same. I have to say that my splurge was a very good investment though, because I know I’ll be making many more recipes from this cookbook! Thank you Santa!

Indian2

Indian Ground Turkey with Peas

2 Tbs vegetable oil

1-inch cinnamon stick

4 cardamom pods

2 bay leaves

1 small yellow onion, diced

3 garlic cloves, peeled and minced

2 tsp fresh grated ginger

1.25 lbs ground turkey or chicken

1 cup fresh or frozen peas

2 Tbs fresh lemon juice

1 tsp garam masala

1/4 tsp turmeric

1/4 tsp cayenne pepper (optional)

1/4 tsp ground black pepper

1/2 tsp salt

Directions:

Heat the oil in a wide, deep pan over medium-high heat. Add in the cinnamon stick, cardamom pods, and bay leaves; stir for about 10 seconds. Add in the onion and sauté until tender, 3-5 minutes. Add in the garlic and stir for about 20 seconds, then add in the ginger and stir for another 20 seconds. Add the ground turkey and cook, stirring often, until cooked through.

Stir in the peas, lemon juice, and spices. Cook for 2-3 minutes or until heated through. Remove bay leaves, cardamom pods, and cinnamon sticks before serving. *I served this dish over brown rice but I imagine it would be amazing eaten alongside warm naan.

(Recipe slightly adapted from Madhur Jaffrey’s Quick & Easy Indian Cooking)

Super Sweet Blogging Award

IMG_9520

I’d like to thank Fae of Fae’s Twist and Tango for nominating me for the Super Sweet Blogging Award! It’s such a treat (no pun intended) to be recognized by other bloggers, and now I get to nominate thirteen blogs myself!

Here are my answers to the Super Sweet Questions:

1. Cookies or Cake?     Cake, please!

2. Chocolate or Vanilla?     Vanilla!

3. What is your favorite sweet treat?     Anything with cookie dough!

4. When do you crave sweet things the most?     Usually after dinner.

5. If you had a sweet nickname, what would it be?     I have absolutely no idea!

My Nominations:

Jess from A Lot On Your Plate

Carissa from At 350 Degrees

Geraldine from Pretty Baking

Vini from Vini Cooks Veg

Yesenia from Yesenia Bakes

Susanna, Kristin, Lindsay, and Jennifer from Mrs. and the Misc.

Christina from Sweet Pea’s Kitchen

Jen from The Scrumptious Pumpkin

Eat, Play, Love

John from Society Red

Domestic Diva, MD

Lesley from Bucket List Publications

Sweet Little Thang

 Rules of the Award:

1. Visit and thank the blogger who nominated you.
2. Acknowledge that blogger on your blog with a link to theirs.
3. Answer the “Super Sweet” questions.
4. Nominate a “Baker’s Dozen” (13) blogs for the award, including a link to their blogs in your post, and notify them on their blogs.
5. Copy & paste the award onto your blog.

Classic Cut-Out Sugar Cookies

IMG_3117

Once a year, I turn up the Christmas music, clear off the counters, and devote an entire day to cookie-baking. Some years I bake with my best friend and her mom, some years we bake with multiple mother-daughter duos, and some years it’s just my mom and me. No matter how many people are there, or how many types of cookies/candy we make, the Christmas spirit always comes alive when I’m in the kitchen rolling out sugar cookies or stirring a pan of boiling fudge with the people I love.

It seems like the more people we get together with, the more treats are made. In the past we’ve tried our hands at taffy, peanut brittle, spritz cookies, peanut butter blossoms, and fudge, but the one type of cookie that is absolutely essential to our baking day is the classic roll-out sugar cookie. I’ve probably tried out a dozen different recipes for Christmas cookies over the years, ranging from Betty Crocker Sugar Cookie Mix to delicate butter cookies to gluten-free sugar cookies. I have to say that my favorite recipe is from a Better Homes and Gardens cookbook that my parents bought me many years ago when I was just starting to bake on my own. The recipe is very simple, rolls out easily, and tastes delicious every time. I love that it includes a pinch of nutmeg in the dough, but you could just leave it out if you’re not a nutmeg fan (in which case I am so, so sorry for the deprivation your tastebuds must face).

In my opinion, when it comes to sugar cookies the quality of the cookie doesn’t matter so much…the main fun is decorating! I’m no food snob when it comes to these…canned frosting? Check. Myriad of sprinkles, colored sugar, edible pearls, chocolate chips, raisins, and whatever other mishmash of toppings I can find in the pantry? Check. Someone to decorate with? Christmas CDs in the stereo? My grandmother’s trusty old rolling pin? The ten thousand or so cookie cutters we’ve collected over the years? Check, check, check, check. The most fun of all is the throng of memories that come pouring in…sticky fingers stretching taffy with a group of giggling friends, a swell of pride from rolling out the dough all by myself, brow furrowed in concentration with the placement of tiny sprinkles as lights on my christmas tree cookie, stomach aches from eating too much frosting. I’m a sucker for traditions.

What are your favorite holiday traditions? Cookie baking? Christmas caroling? Movie watching? All of the above? Happy Holidays, everyone!

IMG_3118

Classic Cut-Out Sugar Cookies

1/2 cup butter, cut into small pieces

1 cup granulated sugar

2 tsp baking powder

1/4 tsp ground nutmeg (optional)

1 large egg

1/2 tsp vanilla extract

2 Tbs milk

2 1/4 cups all-purpose flour

Directions:

In a large bowl with an electric mixer, beat the butter until softened. Add in the granulated sugar, baking powder, and nutmeg; beat for 2-3 minutes or until light and fluffy. Add the egg, vanilla, and milk, beating until well-combined. Mix in the flour until a dough forms.

Pat the dough into a ball, cover in plastic wrap, and refrigerate for 30-60 minutes. When ready to bake, preheat oven to 375 degrees F. Take half the dough out of the refrigerator and turn out onto a floured surface. With a rolling pin, roll the dough into a disc about 1/4″ thick. Cut out shapes as desired. Place cookies on lined cookie sheets, about 2 inches apart.

Bake for 8-10 minutes or until edges are golden-brown. Cool cookies completely before frosting.

IMG_3115

(Recipe adapted from Better Homes and Gardens: Junior Cookbook)

TWO Amazing Cookie Recipes for the Holidays

IMG_3031

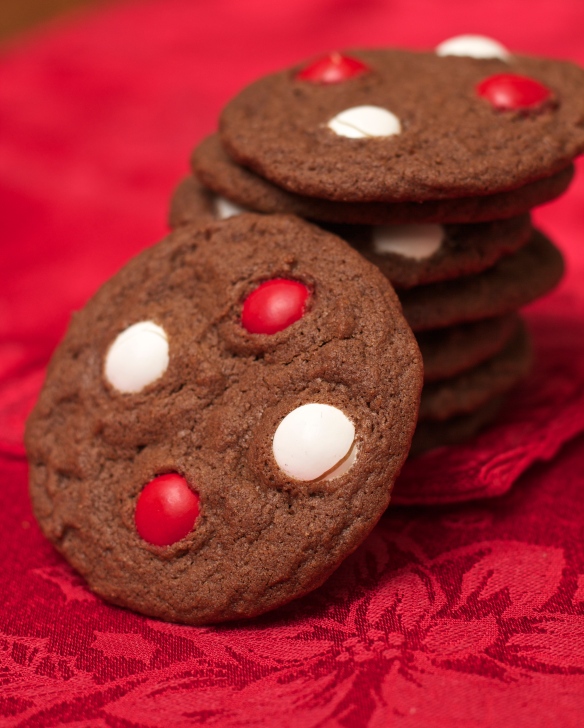
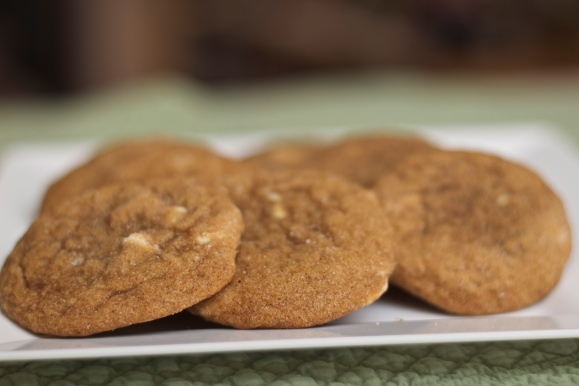
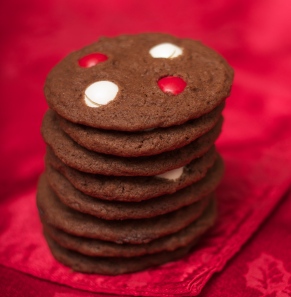
Because Christmas is right around the corner, and because I’ve been doing a ton of baking lately, and because I just feel like spreading a little extra Christmas cheer, today I’m posting TWO delicious cookie recipes that would be perfect for Christmas, Hanukkah, New Year’s, whatever. Delicious Cookie #1, Soft Gingersnaps with White Chocolate Chunks, is basically a soft, moist, slightly chewy, perfectly spiced gingersnap spruced up with white chocolate chunks. The flavor combination of gingerbread-esque spices, molasses, and white chocolate is out of this world! Delicious Cookie #2, White Chocolate Peppermint M&M Cookies, is definitely a must-have for any chocolate-peppermint lover. I just discovered White Chocolate Peppermint M&Ms this year, and they’re amazing just by themselves! They’re even better when baked onto chewy, rich, chocolate-peppermint cookies.

To save this post from being ridiculously long, what with the two recipes and all, I’ll shut my mouth pry my fingers off of the keyboard and get right to the point. So here come the recipes…happy holiday baking! 🙂

IMG_3015

Soft Gingersnaps with White Chocolate Chunks

Yield: 4 dozen cookies

1 cup unsalted butter, at room temperature

1 cup granulated sugar

1/2 cup molasses

2 Tbs vegetable oil

1 tsp vanilla extract

2 1/4 tsp baking soda

1 tsp salt

1 1/4 tsp ground cinnamon

1 1/4 tsp ground cloves

1 tsp ground ginger

2 large eggs

3 1/2 cups all-purpose flour

8 oz. white chocolate, coarsely chopped

Additional white sugar, for rolling

Directions:

Preheat oven to 350 degrees F. Line baking sheets with parchment paper or spray with cooking spray.

In a large bowl, beat together the butter and sugar until smooth. Add in the molasses, vegetable oil, vanilla, baking soda, salt, and spices; mix until well-incorporated. Add in the eggs one at a time, beating until smooth.

Slowly add in the flour, mixing just until combined. Stir in the white chocolate chunks. Scoop dough by rounded tablespoons, roll in granulated sugar, and place on prepared baking sheets. Bake for 9-12 minutes or until cookies are set but still soft.

Let cookies cool on sheets for 5 minutes before transferring to a cooling rack. Store in an airtight container at room temperature.

(Recipe adapted from Two Peas and Their Pod)

IMG_3023

White Chocolate Peppermint M&M Cookies

Yield: 2-3 dozen cookies

14 Tbs unsalted butter, melted and cooled to room temp.

3/4 cup granulated sugar

3/4 cup packed dark brown sugar

1/2 cup unsweetened cocoa powder

1 tsp salt

1 tsp vanilla extract

1 tsp peppermint extract

1 large egg

1 large egg yolk

1 3/4 cups all-purpose flour

1/2 tsp baking soda

1 bag White Chocolate Peppermint M&Ms

Directions:

Preheat oven to 350 degrees F.

Using an electric mixer (or a whisk and some elbow grease!) mix together the butter, sugars, cocoa, salt, vanilla, and peppermint extract until smooth. Add in the egg, followed by the egg yolk, beating after each addition. Gradually stir in the flour and baking soda, mixing just until combined.

Scoop dough by rounded tablespoons and drop onto lined or lightly greased cookie sheets. Press 4 or 5 M&Ms onto each cookie (you may have to flatten them slightly). Bake for 8-10 minutes or until edges are set. Let cookies cool on the sheets for 5 minutes before transferring to a cooling rack.

(Recipe adapted from Number 2 Pencil)

Taking a Moment…

Today’s post is dedicated to everyone affected by the shooting at Sandy Hook Elementary School. I had plans to write a bright, cheerful, humorous post as Christmas draws nearer, but it doesn’t feel right after such a devastating event. The pain, shock, and heartache that the people of Newtown, Connecticut are surely feeling right now is unfathomable. My heart goes out to all the families in Newtown who have lost a child, lost a friend, or just borne witness to this horror. It’s tragedies like these that make me so sad about the world and unable to understand how a human being can be capable of such an act. Murder in itself is horrible, but something about the innocence of a child makes it all the more heart-wrenching. We live in a world that isn’t all sunshine and daisies; there is sadness that I can’t even begin to comprehend. It makes me so grateful for all the good things in my life that I often take for granted: a family who loves me, monthly paychecks, free education, a kitchen full of food.

I’d like to press pause on the Christmas festivities, the bustle of everyday life, and take a moment to send kind thoughts to the people of Newtown. The recipes will be back soon, but not today. Give your family members a hug, tell them you love them, and please take a minute to think about this quote:

candle

“When I was a boy and I would see scary things in the news, my mother would say to me, ‘Look for the helpers. You will always find people who are helping.’ To this day, especially in times of ‘disaster,’ I remember my mother’s words, and I am always comforted by realizing that there are still so many helpers – so many caring people in this world.”          -Fred Rogers

Chocolate Candy Cane Kiss Cookies

IMG_3011

This week I’ve worked hard on improving a personal trait, one that is undoubtedly useful and will help me in various aspects of life. I didn’t used to be very adept in this area, but I’m getting better and better every day. I’ve been practicing my lying!

Now don’t get me wrong. I don’t necessarily think that lying is a positive characteristic, one that should be habitually used and encouraged, but I’m a believer that there are times in life when it’s okay to lie. In some situations it’s really more of acting than actual lying. Take Secret Santa, for example. Every year a group of kids at my high school organizes a game of Secret Santa, and I always sign up. It’s the classic put-your-name-in-the-jar-and-draw-a-name kind of deal and although many kids immediately tell their friends who they got, I like to keep mine a secret. Some people like to hold off on the gifts until the day before we get out for Winter Break, when they give their person a huge present, but I prefer to give my recipient little gifts along the way.

Naturally, I started off the gift-giving by baking. I can’t help it, it’s in my blood! Anyway, I’ve sort of developed a reputation around school as “the baker,” so I knew that everyone would immediately suspect me. Sure enough, when my person opened up their little tin of cookies, complete with a colorfully typed description, all heads turned to me. Luckily, I was prepared.  I played my ignorance card (“Am I his what? I didn’t hear what you were talking about,”) my slightly exasperated card (“No, it’s not me just because it’s cookies! Surely other people like to bake!”), and my casually curious card (“Let me see the handwriting…maybe I can tell who it is…”), all the while keeping a calm, cool, interested-but-not-suspicious demeanor. It was an excellent performance, if I do say so myself. Definitely an instance of acting, not lying.

The show was repeated multiple times as more people saw the cookies and pegged me as the Secret Santa behind them. Again and again I employed my best acting skills, trying hard not to fall into my usual giveaway grin. It was wonderful practice for the next time I have to hide something. Though I’m still not quite sure if my mastering of the art of deception is a good thing or a bad thing….scratch that. I used to be awful at lying, and now I’m passably adequate. I still have a long way to go before I reach the mastering stage, and by then I’ll probably have gotten my morals straightened out.

Now I present to you the real star of the show: Chocolate Candy Cane Kiss Cookies! They pack well, have a great chewy texture, come together quickly, yield a huge amount for gift-giving, and best of all have that wonderful combination of chocolate and peppermint! If you can’t find Candy Cane Kisses, any other type of Hershey’s kiss will do, but if you can find them they really are the best. Paired up with the chocolate cookie base and the mini chocolate chips studded throughout, these kisses make for one delicious cookie. You’ll want to take credit for these babies…I wish I could! 😉

IMG_3013


*Note: to give the cookies a more swirl-like appearance, I like to pluck off the pointy tips of the kisses after pressing them in. You get a prettier cookie (in my opinion), and you get to eat all the tips! ‘Cause I’m all about win-wins.

Chocolate Candy Cane Kiss Cookies

1/2 cup unsalted butter, softened to room temperature

1/2 cup butter-flavored shortening

1 cup brown sugar

1 cup granulated sugar

2 large eggs

1 1/2 tsp vanilla extract

2 1/2 cups all-purpose flour

6 Tbs unsweetened cocoa powder

1 tsp baking powder

1 tsp baking soda

1/2 tsp salt

1 1/2 cups mini chocolate chips

48 Hershey’s Candy Cane Kisses, unwrapped

Directions:

Cream together butter, shortening, and sugars on medium-high speed with a mixer until light and fluffy. Add in the eggs one at a time, followed by the vanilla. In a separate bowl, whisk together the flour, cocoa powder, baking powder, baking soda, and salt.

On low speed or with a wooden spoon, gradually add the dry ingredients to the butter mixture. Stir in chocolate chips. To prevent cookies from spreading, chill for 30-60 minutes.

When ready to bake, preheat oven to 350 degrees F. Drop tablespoonfuls of cookie dough onto un-greased or lined cookie sheets. Bake for 8-10 minutes or until cookies are set but still soft.

Allow cookies to cool on sheets for 1-2 minutes, then press a Candy Cane Kiss into the center of each cookie. Transfer cookies to a cooling rack to cool completely. It will take several hours at room temperature for the kisses to re-harden. (To speed things up, place cookies in the refrigerator or freezer). Store in an airtight container at room temperature.

Yield: about 4 dozen cookies (Recipe adapted from Our Best Bites)

Chocolate Chip Cookie Dough Fudge

IMG_3003

Since I was little, I’ve been a notorious cookie-dough lover. Whenever my mom and I  baked cookies I would do whatever I could to make sure I ended up with a sufficient number of tastes before the cookies made it into the oven. That meant licking the spatula, licking the spoon, scraping the bowl, and forming the dough balls with my fingers so that I could have an excuse to lick them, too. It’s a wonder I never got salmonella! No matter, I loved my cookie dough. Once in a blue moon I managed to convince my parents to buy a roll of Toll House chocolate chip cookie dough, which always seemed to taste so much better than any homemade dough. Most likely because of all of the artificial flavors, sweeteners, and preservatives. But boy did that dough taste good!

I wish I could say that I’ve overcome my cookie dough addiction, but sadly I have not. In all honesty I much prefer cookie dough to actual cookies, which is too bad since cookie dough contains raw eggs and I know I shouldn’t be eating it. Sigh. The good news is, there are more of my kind in the world! Other cookie dough addicts! Like Lindsay Landis from Love and Olive Oil, who wrote an entire cookbook full of eggless cookie dough recipes! My dream come true. This recipe for cookie dough fudge is from her book, and it’s definitely not for the faint-hearted. I can only handle eating one tiny delicious square at a time since it’s so rich…it tastes exactly like you’re eating a hunk of raw cookie dough! Also, since it’s eggless there’s absolutely no risk of making yourself sick…unless of course, you eat the entire pan. And with this fudge, I wouldn’t blame you.

DSCI0337


Chocolate Chip Cookie Dough Fudge

Yield: one 8″x8″ pan, about 36 servings

For the cookie dough:

1/3 cup butter, softened to room temperature

1/4 cup granulated sugar

1/4 cup light brown sugar, packed

1/2 tsp vanilla extract

Pinch of salt

2 Tbs half-and-half

1/2 cup all-purpose flour

1/2 cup mini chocolate chips

For the fudge base:

1/3 cup light brown sugar, packed

1/3 cup butter

Pinch of salt

1/3 cup half-and-half

4-5 cups powdered sugar

1 tsp vanilla extract

1/4 cup mini chocolate chips (for topping the fudge)

Directions:

Line an 8″x8″ baking pan with aluminum foil, leaving overhang around the edges. Set aside.

For the cookie dough, in a medium bowl, beat together the butter and sugars until light and fluffy. Beat in the vanilla, salt, and half-and-half. Stir in the flour, mixing just until combined. Fold in the 1/2 cup of chocolate chips. Set aside.

For the fudge base, in a medium-sized saucepan, combine the brown sugar, butter, salt, and half-and-half. Place over medium-low heat and cook, stirring constantly, until the butter is melted and the sugar is dissolved. The mixture should be smooth. Remove the pan from heat and stir in the vanilla. Add in the powdered sugar, one cup at a time, until desired consistency is reached. (The more powdered sugar you add, the sweeter and thicker the fudge will be). Let the mixture cool for about 5 minutes before proceeding.

Fold the cookie dough into the fudge mixture. If you like chunks of cookie dough, gently fold so that the two mixtures aren’t completely combined; if you want a uniform fudge, mix the cookie dough in completely. Press the fudge into the prepared pan and smooth the top. Sprinkle with remaining 1/4 cup chocolate chips and gently press them into the dough.

Chill for 3-4 hours. Then lift the fudge out of the pan, invert onto a cutting board, and slice into squares. This fudge can be stored in an airtight container for up to 1 week in the refrigerator!

(Recipe adapted from Mel’s Kitchen Cafe, originally from The Cookie Dough Lover’s Cookbook)

Harvest Apple Oat Bran Muffins

IMG_2995

Christmas shopping is a dangerous activity for people like me. Normally I consider myself a fairly frugal shopper, buying only what I can afford, maybe allowing room for a little splurge now and then, but generally sticking to a list of necessities. When Christmas season rolls around, all that rationality is kicked to the curb and I become a googley-eyed little kid, falling into every spending trap and magnetizing toward anything cute and Christmasy. Or anything cute. Or anything Christmasy. It’s a problem.

Last weekend my mom and I went Christmas shopping all by ourselves, which is a danger for several reasons. One, we are not endowed with the spacial awareness gene and wind up getting lost nearly every time we travel together. We’ve ended up on dirt roads with nothing but farms and cows, determined that “this road will definitely lead to the highway at some point;” we’ve taken one-way streets down narrow old neighborhoods that dead-end after twenty minutes of driving; we recently missed our exit (the one we take every single time) and drove for twenty miles before noticing that we were on our way to Seattle, which is about 100 miles out of our way. Whoops.

Reason number two is that we always manage to spend an inordinate amount of money, though I can never quite peg down where we went wrong. We only put the things we need on our list (with a few minor exceptions), stick religiously to said list (for the most part), and don’t let ourselves get carried away with the eye-catching displays of fuzzy socks, cute little knick-knacks, and seasonal candy strategically placed every 5 feet in the mall (in an alternate universe, that is). I can’t understand for the life of me how that money piles up…

My original claim of frugality is seeming a little questionable. I promise, as soon as January rolls around I become sane again! It’s just something about those Christmas carols, cozy clothes on display, and bright decorations that make me want to buy everything in the universe. I’m not an easy marketing target or anything. Anyway, I didn’t do too badly this year. Part of the reason was that we ran out of time and had to rush to catch the ferry home, but I’ll pretend that it’s because my holiday season self-control is steadily improving.    I really really wanted to grab a Vanilla Bean Noel lotion for myself at Bath and Body Works while I was shopping for my friends…but I didn’t. And I really really wanted to get a new CD of Christmas music even though we already have approximately 20 million…but I didn’t. And I really really wanted to buy white-chocolate peppermint M&Ms, a pair of fuzzy socks, a third roll of wrapping paper because I just couldn’t pick two, and a bag of limited edition candy cane Hershey’s kisses….so I did. It’s a work in progress.

I’m sure you’ve figured out what this is all leading up to…bran muffins! Hah. I try to make my posts at least semi-relate to the recipe at the end, but you can’t win them all, right? Seriously though, these muffins are an awesome healthy treat to make during the holiday season, perhaps as an anecdote to the massive amounts of sugary treats that appear throughout December. These guys are still delicious, but will make you feel like you’re actually putting something good into your body. Then you can be justified to turn around and eat those candy cane kisses! I made Harvest Apple Oat Bran Muffins with chopped apple, cinnamon and allspice, cranberries, golden raisins, and pecans, but feel free to adapt. With these muffins, you can’t go wrong!

IMG_2989

Harvest Apple Oat Bran Muffins

Yield: 12 muffins

1 1/4 cups whole wheat flour

1 cup oat bran

1/3 cup packed brown sugar

2 1/2 tsp baking powder

1/4 tsp baking soda

1/4 tsp salt

1 tsp ground cinnamon

1/2 tsp ground allspice

1 cup milk

2 egg whites

2 Tbs vegetable oil

1 tsp vanilla extract

1 cup peeled, diced apple (I used one medium-sized Granny Smith)

1/2 cup dried cranberries

1/2 cup golden raisins

3 Tbs chopped pecans

Directions:

In a medium bowl whisk together flour, oat bran, brown sugar, baking powder, baking soda, salt, cinnamon, and allspice. Set aside.

In a small bowl whisk together milk, egg whites, oil, and vanilla. Pour wet ingredients into the flour mixture and stir just until incorporated. Fold in chopped apple, dried cranberries, and raisins. Batter can be stored, tightly covered, in the refrigerator for up to 3 days.

When ready to bake, preheat oven to 375 degrees F. Line a 12-cup muffin tin with paper liners or spray with baking spray. Scoop batter into muffin tins and sprinkle with chopped pecans. Bake for 18-20 minutes, or until an inserted toothpick comes out clean. Transfer muffins to a wire rack to cool, then store in an airtight container.

IMG_2996

(Recipe adapted from Recipes.com)

Caramel Pretzel Turtles

DSCI0336

I’ve always wondered why in the world of baking, “turtles” referred to a combination of caramel and pecans. I’ve heard of turtle ice cream, turtle sundaes, and turtle brownies and could never understand what caramel and pecans could possibly have to do with turtles. Until I made these Caramel Pretzel Turtles and had a revelation. When pecans are whole, they look a lot like a little turtle shell. Mystery solved! I could be wrong about this, but let’s just say I’m right because it makes such perfect sense. I love it when things actually make sense, unlike the facts that:

A fat chance and a slim chance are the same thing

Feet smell and noses run

We play at recitals and recite at plays

Quite a few and quite a lot mean the same thing

We fill out forms by filling them in

We drive in parkways and park in driveways

The word lisp has an “s” in it

It’s nice to know that these Caramel Pretzel Turtles actually have a legitimately logical name. And I can guarantee that when you pop one of these salty, caramel-y, chocolatey, nutty little turtles into your mouth, everything will feel right in the world. These are dangerously delicious turtles, my friend.

Caramel Pretzel Turtles

Yield: 24 candies

2 dozen pretzels (I like to use the square kind)

2 dozen Rolos

2 dozen shelled pecans or M&Ms

Directions:

Preheat oven to 350 degrees F. Line a cookie sheet with parchment paper or baking mats. Place pretzels onto cookie sheets and top with Rolos. Bake for 3-4 minutes, or until chocolate is shiny but still maintaining its shape.

Immediately press a pecan or M&M onto each pretzel. Allow them to cool for at least 30 minutes, or until chocolate is set.