Soft and Chewy M&M Cookies

IMG_1370I once read an article that smell is the most powerful sense when it comes to triggering memories. While this surprised me initially, as I thought about it it seemed to be somewhat true. Even though sights and sounds appear to dominate our everyday experiences, smell sure does have a strong connection to memories. I’m sure I’m not the only one who breathes in the scent of fresh pumpkin and is taken back to early days of trick-or-treating, or who takes a whiff of salty, seaweed-y ocean air and remembers long summer afternoons spent at the beach.

Taking it one step further, specific foods always bring to mind certain places for me. Cinnamon rolls, for instance, always remind me of the bakery around the corner from my grandparents’ house. Rainier cherries take me back to the tiny general store near one of the campgrounds I frequented as a child, and tomato-cheddar bagels will always be reminiscent of Bagelopolis, a long-gone favorite breakfast joint. M&M cookies go hand-in-hand with Subway in my tangled repertoire of memories.IMG_1368

Whenever I went to Subway as a child I always ordered the exact same sandwich: Italian bread with yellow mustard and extra American cheese. No meat, no veggies. Just mustard and extra cheese, emphasis on the extra. Two tiny triangles of that delicious plastic-y white stuff just wouldn’t cut it. I used to get so frustrated at answering the same questions over and over: “I’m sorry, what kind of meat?” “No meat?” “Are you sure?” “No veggies at all?” “That’s it?” No meat. That is correct. Yes, I’m sure. No, no veggies. YES, that’s IT. Since eating at Subway was a special occasion anyway, my parents just went along with it, standing patiently as their children’s sandwiches of choice were wrapped up: mustard and (extra) cheese for their little girl and tuna (no cheese, no veggies, no sauce, JUST TUNA) for their little boy.

I always chose Ruffles cheddar & sour cream chips to go with my sandwich, and if my brother and I were lucky we each got to pick out a giant cookie from the tempting glass case next to the cash register. For years, my cookie of choice was always M&M. Who could resist those bright dots of color? Certainly not me! Those soft, chewy, M&M-studded cookies were always the perfect ending to my special lunch (or, if my parents weren’t paying attention, the perfect beginning!) muahaha.IMG_1365

I haven’t had a cookie from Subway in years (nowadays I’m one of those boring whole wheat-turkey-every-veggie-you’ve-got-hold-the-cheese people), but making these homemade M&M cookies brought me back to Subway visits long ago, back when I still got a toy thrown into the bag and extra cheese on my white bread with mustard. If I do say so myself, these cookies are even better than the Subway version. They’re much less dry, and stay amazingly soft for several days due to the pudding mix hidden in the batter. They also have the same great chewy texture as their Subway counterparts, especially around the edges. And of course, they’re packed full of M&Ms–the best part!

These fun (and delicious!) M&M cookies will make you feel like a little kid again, whether you’ve gotten them from Subway or not. (I’ve been told that M&M cookies can, in fact, be found in other places ;).) Enjoy!

IMG_1372IMG_1371


Soft and Chewy M&M Cookies

1 cup unsalted butter, at room temperature

3/4 cup light brown sugar, packed

1/4 cup granulated sugar

3.4 oz package instant vanilla pudding mix

2 large eggs, at room temperature

1 teaspoon vanilla extract

2 & 1/4 cups all-purpose flour

1 teaspoon baking soda

1/2 teaspoon salt

2 cups M&Ms (about 1 medium-sized bag)

Directions:

In a large bowl, beat together the butter and sugars until light and fluffy. Add in the eggs one at a time, scraping down the bowl as needed. Mix in the vanilla.

In a smaller bowl, whisk together the flour, baking soda, and salt. Gradually stir the flour mixture into the wet ingredients, mixing just until incorporated. Stir in 1 & 1/2 cups of M&Ms, reserving the last 1/2 cup. Chill the dough for at least 30 minutes to prevent spreading.

When ready to bake, remove the cookie dough from the refrigerator and preheat the oven to 350 degrees F. Line baking sheets with parchment paper or a silicon mat. Scoop the cookie dough into balls (mine were about 1.5 tablespoons each) and place onto prepared cookie sheets. Bake for 10-14 minutes, depending on the size of your cookies, or until the edges are slightly golden and the tops are set. Keeping them on the under-done side will ensure soft and chewy cookies.

Let the cookies cool on the baking sheets for 5 minutes, then remove to a cooling rack. Store in an airtight container at room temperature for up to a week.

(Recipe adapted from Two Peas and Their Pod)

Sweet Cherry Galette with Almond Streusel

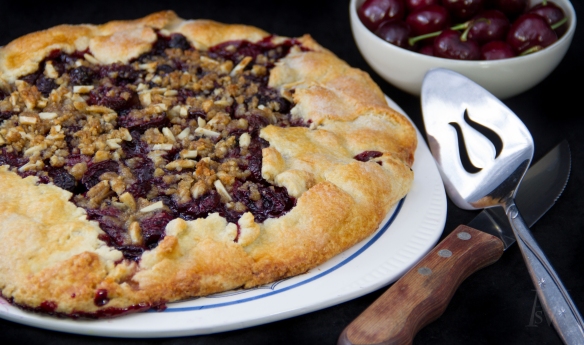
IMG_0679What you see here is our Father’s Day dessert from the other week. My dad has always been a “pie guy,” and cherry pie just might be his favorite dessert in all the world. It is not an unusual occurrence for us all to be sitting around the living room after dinner when my dad moans out that he “neeeds pie.” Since nine times out of ten he’s the one who jumps up and out the door the minute anyone mentions a needed grocery item, oil change, package mailed, etc., we all try to satisfy his pie cravings now and then.

Of course, a sudden “neeeed” for pie doesn’t leave a lot of any time for homemade pie, so we often have to resort to Marie Callender or those horrid plastic-containered grocery store pies found in the bakery section. Since I’m the only one in my family who bakes, my year away from home resulted in far too many of those pre-packaged pies making their way into our refrigerator. Like many bakers, it pierces my heart to see someone eat a slice of that scary-bright-red cherry “pie” with glee and complete ignorance of what they’re missing. Not that people shouldn’t be satisfied with anything other than homemade, but….they’re just different species, store-bought pie and pie from scratch. Not only is the list of ingredients on the back of those packages far too long and scary-sounding for my liking, but the taste of real buttery crust and fresh fruit just can’t compare. No offense if you happen to love pre-made pies (I’ve certainly eaten my fair share), but my heart will always belong to homemade.IMG_0702

Anyway, it saddened me to think that that my poor father had forgotten what real pie tastes like. So for Father’s Day, there was no doubt in my mind that homemade cherry pie (or in this case, galette) would be gracing our table.

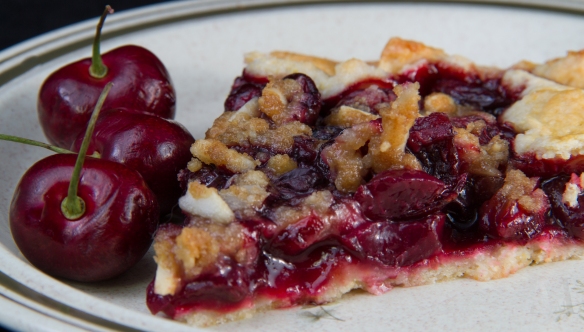
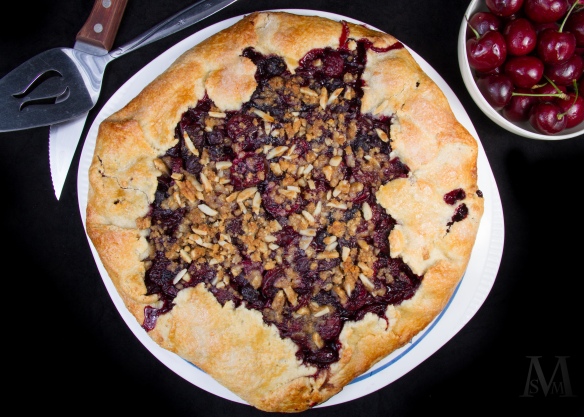
This cherry galette is made with sweet, fresh bing cherries rather than jarred or frozen sour cherries, so it has a rather different taste than “regular” cherry pie. I wouldn’t say it’s better or worse; it’s like comparing apples and oranges. While sour cherry pies have that distinct tart flavor and a syrupy filling, this sweet cherry galette is more mild and fresh-tasting. I love both, but I’m partial to fresh, sweet cherries in the spring and summer, so I bought a bag of beautiful bing cherries and got to work. Naturally, as I was in the middle of pitting the cherries (using a hard plastic straw as a makeshift cherry-pitter) I looked down and realized I was wearing a white shirt. I swear, every.single.time I pit cherries I happen to be wearing white. It’s ridiculous, I tell you!

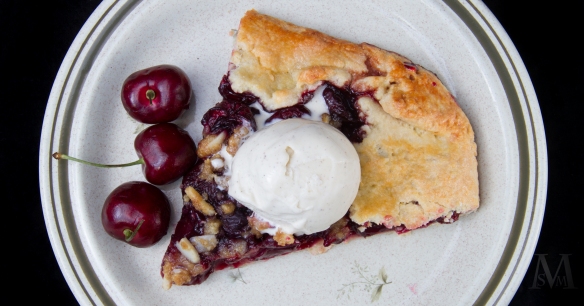
The crust of this galette is tender and flaky, and the secret addition of cornmeal adds a little somethin’-somethin’ to the texture and the flavor. However, in my mind the real star of the show is the cherries, which are combined with minimal ingredients to really let their flavor shine through. I topped the galette with a generous sprinkle of almond streusel, and the almond flavor marries perfectly with the cherry. Each bite of buttery crust, juicy cherries, and crumbly topping will leave you wanting another…and another. I added a scoop of vanilla bean gelato to each piece as well, which only made it more swoon-worthy. The entire galette was eaten up in less than 48 hours (by 4 people, I might add–and I only had a sliver)!

IMG_0711

Being a fruit girl (as opposed to a crust girl), one of the reasons I love galettes is for their greater ratio of filling-to-crust, since a galette is basically an open-faced pie. Another reason I make them more often than pies is for their simplicity: they’re supposed to look rustic (read: messy), and you don’t have to worry about perfectly crimped edges or smooth tops. All you do is roll out a single crust, plop the fruit filling in the center, and fold up the extra crust toward the center. In this case, folds and creases are what you’re going for, which is a total dream-come-true for anyone who tends to avoid making finicky pie crust. Not that I have any personal experience with fears of pie crust, but you know…

Yet another beauty of galettes is their adaptability–you can substitute the cherries for virtually any fruit, and the streusel can be played with as well. You can use all butter instead of the almond paste, use a different type of nut, or leave out the almonds all together and sub in some oats. Still, I must say that we certainly loved this combination of cherries and almond streusel, and it made for one very happy father on his special day!

IMG_0695

Sweet Cherry Galette with Almond Streusel

For the crust:

1 & 3/4 cups all-purpose flour

1/3 cup granulated sugar

1/4 cup yellow cornmeal

1/4 teaspoon salt

1/2 cup very cold butter, cut into small chunks

1/3 cup cold buttermilk*

For the fruit filling:

1.5 pounds (about 3.5 cups) fresh bing cherries, pitted and halved

1/3 cup granulated sugar

1 tablespoon + 1 teaspoon cornstarch

1 tablespoon fresh lemon juice

1/2 teaspoon salt

1/2 teaspoon vanilla extract (optional)

1/4 teaspoon almond extract (optional)

For the streusel:

2 tablespoons all-purpose flour

2 tablespoons brown sugar, packed

1 tablespoon almond paste (you can substitute with butter)

1 tablespoon butter

2 tablespoons sliced or slivered almonds

For assembling:

1 egg beaten with 1 tablespoon warm water

Extra sugar, for sprinkling

*You can make your own buttermilk by putting 1/4 teaspoon of vinegar or lemon juice into a 1/3 cup measure, and then filling the cup with regular milk. Let sit for 5 minutes or so, until the milk curdles, then proceed to use.

Directions:

For the crust, whisk together the flour, sugar, cornmeal, and salt in a large bowl. Using a pastry cutter or a fork, cut in the cold butter until the mixture is coarse and crumbly. Slowly pour in the buttermilk, tossing with a fork until the dough holds together. Then pat it into a ball, wrap in plastic wrap, and chill for at least 45 minutes.

When ready to bake, preheat the oven to 375 degrees F. Let the dough stand at room temperature for 5-10 minutes, then turn out onto a floured surface and roll it into a 14-inch round. Carefully transfer the crust onto a cookie sheet lined with parchment paper or a silicon mat, then place in the refrigerator for 15 minutes.

While the oven is preheating and the crust is chilling, make the cherry filling. In a large bowl toss together the pitted cherries, sugar, lemon juice, cornstarch, salt, vanilla, and almond extract. In a smaller bowl, use a fork (or your fingers) to combine the streusel ingredients until they clump together.

Remove the crust dough from the refrigerator and pile the cherries into the center, leaving a 1.5-2 inch border around the edges. Fold the excess dough toward the center, smoothing down the creases where the dough overlaps. Sprinkle the streusel over the top of the cherries. Brush the egg mixture onto the crust and sprinkle the crust with granulated sugar.

Bake the galette for 45-60 minutes, or until the crust is golden and the filling is bubbly. Place the cookie sheet on a wire rack to cool for 15 minutes, then slide the galette directly onto the rack to cool completely.

Slice and serve with vanilla ice cream or whipped cream, if desired.

(Recipe adapted from Two Peas and Their Pod and Kitchenette)


Flourless Chocolate-Peanut Butter-Banana Muffins

IMG_0388First of all…Happy 2nd Anniversary to Emma’s Baking Addiction! I can’t believe that two years ago I sat down and created a WordPress account with no idea what I was doing. Sometimes I still feel like I have no idea what I’m doing, but it’s been fun 🙂

These muffins were made with my mother in mind. My poor gluten-free, dairy-free mother, who has to watch as piles of cookies, ice cream, brownies and other taboo treats fill our kitchen, knowing she can’t have them. She never complains, not once, but I try to make sure that I create a fair share of gluten-free, dairy-free baked goods as well.

IMG_0392

The last mom-friendly treats I made were these awesome little energy balls, but they were eaten up in approximately 12 seconds, give or take a couple days. The problem with gluten-free treats is that they are also accessible and perfectly acceptable to the gluten-eaters in the house, and unless I clearly label treats as being “FOR MOM” (or hide them), they disappear way too quickly. Which is why, after the last three blog posts centered around cookies and ice cream, it was time to make these muffins.

IMG_0387

What these muffins do have: peanut butter, chocolate, & banana (one of the ULTIMATE flavor trios), heart-healthy flaxseed, and a handful of other healthy ingredients. What these muffins do not have: FLOUR, gluten, dairy, or more than two tablespoons of refined sugar. What these muffins require: a bowl, a spoon, a muffin tin, and some measuring cups. That’s it! They don’t require worrying about over-mixing (which can create tough muffins, but ONLY if there’s gluten involved) or dirtying up a million little bowls and spoons. Easy as cake muffins!

IMG_0398

IMG_0395


The best part is that, despite their considerably healthy list of ingredients and their lack of flour, these muffins are not lacking in flavor or texture! They have a wonderful soft, dense-yet-springy texture and are smooth and rich. The peanut butter/chocolate/banana flavors really shine through, and the muffins are full of flavor but not overly sweet. They were a huge hit in our house for both the gluten-free eater (my mom) and all the other eaters. They were so popular, in fact, that I had to take my mother aside and let her in on my little secret: I had snatched a few muffins from the communal container and hidden them away in a tupperware in the freezer. That way she could snack on them whenever she saw fit, safe from all other muffin-eaters. If you feel the need to hide away a few of these muffins for yourself, you won’t see me judging you!!

IMG_0398

Flourless Chocolate-Peanut Butter-Banana Muffins

1 cup mashed banana (from about 2 medium-large bananas)

1 cup creamy peanut butter

1/4 cup honey or agave nectar

2 tablespoons brown sugar

1/3 cup unsweetened cocoa powder

2 large eggs

1 tablespoon ground flaxseed (optional)

2 teaspoons vanilla extract

1 teaspoon baking soda

1/4 teaspoon salt

1/2 cup chocolate chips (optional)

Directions:

Preheat oven to 425 degrees F. Grease or line a 12-cup muffin tin.

Mix together all of the ingredients in a large bowl until well-combined. Divide evenly among muffin cups, filling about 3/4 of the way. Bake for 5 minutes, then decrease oven temperature to 350 degrees. Bake for an additional 10-15 minutes, or until the muffin tops spring back when lightly touched and an inserted toothpick comes out clean.

Cool in the muffin tins for 15 minutes, then run a knife around the edges of each muffin and carefully remove to a cooling rack. Store the muffins in an airtight container for up to 5 days.

(Recipe inspired by Averie Cooks and Detoxinista)

Chunky Monkey Ice Cream Sandwiches

IMG_0308Sorry but not sorry about the ice cream sandwich deja vu on the blog…I know I just recently posted these (amazing!) Browned Butter Chocolate Chip Cookie Ice Cream Sandwiches, but they were such a huge hit that I couldn’t help but experiment with a new type of ice cream sandwich. I mean, really. The only thing better than a fresh, soft, homemade cookie is TWO fresh, soft, homemade cookies sandwiching a thick layer of ice cream. Perfect for a summer night treat!

After much brainstorming, I came up with this combination for ice cream sandwiches: thick & chewy oatmeal cookies studded with chocolate chunks and walnut bits, layered with homemade roasted banana ice cream. I call them Chunky Monkey Ice Cream Sandwiches after the iconic banana/chocolate/nut trio. Sometimes Way too often, things are better in my head than in real life, but not with these babies! Ohhhh no. The flavors, the textures, they all play off each other in these little sandwiches to create one of the most delicious desserts I’ve made in quite a while (yes, I know I say that all the time)!

IMG_0298

The oatmeal cookies are just what I had hoped for: chewy in the centers, slightly crispy around the edges, and chock-full of oats, chocolate chunks, and chopped walnuts. And the ice cream….oh, the ice cream. This is review for those of you who’ve read my last few posts, but this roasted banana ice cream is no joke. It begins with roasting bananas in a bit of butter and brown sugar until they’re soft and starting to caramelize, and ends with blending them up into a creamy ice cream mixture that is then churned and frozen.

While the cookies and ice cream are fabulous by themselves, put them together and you’ve got something on a whole other level. These ice cream sandwiches are certainly something to indulge in, but that just makes them all the more special. They’ve even been deemed by one of my brother’s friends as THE best ice cream sandwiches ever. Worth a try, right? 😉

IMG_0295

Chunky Monkey Ice Cream Sandwiches

Yield: about 15-20 ice cream sandwiches

1 batch Oatmeal-Chocolate Chunk Cookies

1 batch Roasted Banana Ice Cream

Directions:

Freeze the cookies for 30 minutes or until hard. Let the ice cream soften at room temperature for about 10 minutes. Then, working quickly, place a scoop of ice cream (I used about 2 tablespoons) onto the flat side of a cookie. Place another cookie on top, pressing down gently until the ice cream reaches the edges. Repeat with remaining cookies. I like to cut up squares of plastic wrap ahead of time, then wrap up each finished ice cream sandwich individually and place in the freezer as I go.

Roasted Banana Ice Cream

IMG_4743 I always have been and always will be a banana-lover. Yes, yes, I know that many people will tell you that bananas are starchy fruits that are quite high in sugar, and some nutritionists practically consider them taboo, but they just have too many good things going on to be removed from your (or at least my!) diet. Slightly under-ripe bananas actually have a much lower glycemic index than ripe ones (meaning that they digest more slowly and won’t cause as much of a blood-sugar spike) and are full of probiotics. While super ripe bananas have more quickly-absorbed sugar, they also are rich in cancer-preventing antioxidants. Basically, you win either way. (And no, I promise that a. this isn’t going to become a nutrition blog, and b. I am not being compensated by any banana company or anything of the sort to say a bunch of wonderful things. I just really love bananas.)

And that’s not all! Bananas are also a great source of electrolytes (I almost always have half a banana after a long run), mashed banana is a great substitute for oil/butter/etc. in many recipes, bananas’ natural sweetness lends itself to baked goods (meaning that you can cut down the refined sugar when creating a recipe with bananas) and they also give baked goods a soft, moist texture. Not to mention their delicious flavor! IMG_4744 Now that we’ve established that I really really love bananas, let’s bake with them! Roasted Banana Ice Cream is on the menu for today, and it’s one of the most delicious ice creams I’ve ever made. The roasting bananas made my kitchen smell like bananas foster, and the resulting ice cream was perfectly thick, smooth, and full of caramely-banana flavor. It comes together much more easily than custard-based homemade ice cream, and has a considerably less sugar and fat than many ice cream recipes due to the sweet, thickening bananas. I wouldn’t go so far as to say that this is healthy ice cream, but that’s not really the point when it comes to ice cream. At least not in my opinion.

Celebrate the first month of summer with a bowl of Roasted Banana Ice Cream! It would be amazing drizzled with caramel sauce, hot fudge, melted peanut butter (omg), or chopped nuts. Or in another delicious form, which may be coming soon to Emma’s Baking Addiction (hint, hint…). I need to roast bananas more often, because when I do, amazing things happen. Happy eating! IMG_4745   Roasted Banana Ice Cream

Yield: about 1 quart

3 medium ripe bananas, peeled and cut into 1/2-inch slices

1/3 cup brown sugar, lightly packed

1 tablespoon butter, cut into small chunks

1 & 1/2 cups whole milk

2 tablespoons granulated sugar

1/2 teaspoon vanilla extract

1/2 teaspoon ground cinnamon

1 & 1/2 tablespoons fresh lemon juice

1/4 teaspoon salt

Directions:

Preheat oven to 400 degrees F. Place the banana slices in an 8″x8″ baking pan and toss them with the brown sugar and butter pieces. Roast uncovered for 25-40 minutes, stirring halfway through, or until the banana slices are lightly browned and caramelized.

Place the bananas (and all the syrupy mixture from the pan) into a blender or food processor. Add in the rest of the ingredients and blend until smooth. Pour the mixture into a bowl or large (4-cup) measuring cup and chill for at least 8 hours. Then pour the mixture into an ice cream maker and churn according to your ice cream maker’s instructions. Serve immediately (at a soft-serve consistency) or freeze the ice cream until firm.

(Recipe adapted from Brown Eyed Baker, originally from The Perfect Scoop)

Oatmeal-Chocolate Chunk Cookies

IMG_4737

Welcome to the workings of my over-analytical brain…read on if you have the inclination, or feel free to skip down to the recipe. I won’t blame you, ’cause cookies are always the best part! 🙂

One of the biggest mistakes that I think people make after graduating high school is believing that what they decide to do next will solely determine the rest of their lives. While it’s certainly true–and certainly a bit scary–that every new choice will AFFECT their adult lives, I have to keep reminding myself that things change. Transfers can be made; majors can be changed; job interviews may be botched and apartment deals may fall through. It’s way too constricting to think in terms of finding that ONE perfect college, major, job, etc., because you never know what new passions, opportunities, or disappointments may come along.

IMG_4734

This past year has taught me to take life one step at a time. Contrary to how it sometimes feels near the end of high school/beginning of college, there’s no “right choice” as to what to do next. I’m more than happy with the school I chose, and although I’m pretty set on minoring in Spanish I still haven’t decided on a major. Psychology and creative writing are the top contenders, both of which I have a natural interest in and see myself pursuing as careers in some form or another. The problem was that for a long time, I kept thinking in terms of elimination, as though I had to keep crossing off less-important interests in my life until I narrowed it down to the one, the strongest of my interests that would then become my career.

As I thought about it though, I decided that that was ridiculous. My dad, an anthropology major/geography minor, has been a construction worker, park ranger, and teacher during different times in his life, and almost every adult I can think of has followed more than that one perfect path. It’s not as though I can make a huge mistake by majoring in creative writing, as if I would have to somehow give up my interest in psychology or any hope of having a career in which it’s involved. Yes, my chosen degree may change my range of job opportunities or qualifications after college/grad school, but I have to believe that things tend to work out in the end. Sometimes I have to tell my cut-throat, rational self to shut up for a minute and let my optimist side take the lead!

Basically, my philosophy right now is to experiment, find out what I love and what I don’t love as much as I thought I did, and get rid of the mindset that I can’t have more than one  passion. Aaaand, that passion doesn’t necessarily have to take form as a job! Maybe someday it will be harder to simply “change my mind,” but for now that’s kind of the point. One of my favorite quotes has always been “the biggest mistake you can make in life is to live in fear of making one!”

IMG_4733


You know, all of this applies to more than just school and education and careers…it also applies to cookies. I see recipes all the time claiming to be the best this, the perfect that, and sometimes I fall into the trap of trying to choose. Somewhere out there must be the perfect chocolate chip cookie recipe, the perfect flawless pie crust, the best blackberry pie. But maybe, just maybe, there can be more than one “perfect!” Sometimes I’m in the mood for the super-soft chocolate chip pudding cookie, but other times I want the more traditional thick and chewy ccc’s. I often fall into the habit of making my favorites over and over again (which, by the way I do not see as a problem!), buuuut sometimes it’s fun to try something else, something that might be just as good in its own different way.

IMG_4738

I’ve probably tried about a dozen different oatmeal cookie recipes over the years, ranging from thin/crispy/chewy to thick/soft/chunky. Sometimes I’m more creative with dried cranberries, white chocolate chips, coconut, macadamia nuts, etc., and sometimes I leave the cookies plain and pure. For some recipes I add in raisins and a dash of cinnamon, while other times I go for chocolate chips. Often I add both! Is there one right way to make oatmeal cookies? I say no!

So, although I already have these and these and these and these and these aaaand these on the blog, I’m adding another oatmeal cookie recipe. Because it’s always good to have options! And who can say no to Oatmeal-Chocolate Chunk Cookies? These are in the camp of crispy on the edges, chewy in the middle, and extra-oaty. Definitely one of the best cookies around 🙂

IMG_4741

Oatmeal-Chocolate Chunk Cookies

Yield: about 3 dozen cookies

1 cup butter, softened

1 cup brown sugar, packed

3/4 cup granulated sugar

2 eggs

2 teaspoons vanilla extract

1 & 1/2 cups all-purpose flour

1/2 teaspoon baking powder

1/2 teaspoon salt

3 cups old-fashioned oats

1 & 1/2 cups chocolate chunks

1/2 cup chopped walnuts

Directions:

Preheat oven to 350 degrees F.* Line two baking sheets with parchment paper or a silicone mat and set aside.

In a large bowl, cream together the butter and sugars until light and fluffy. Beat in the eggs one at a time, followed by the vanilla.

In a smaller bowl, whisk together the flour, baking powder, and salt. Stir the flour mixture into the wet ingredients just until combined. Stir in the oats, chocolate chunks, and walnuts. Form the dough into balls about 1.5 tablespoons each. *To prevent spreading, you may choose to chill the unbaked cookies for 30-60 minutes. In this case, wait to preheat the oven.

When ready to bake, place the cookie dough balls 2 inches apart onto prepared cookie sheets. Bake for 12-14 minutes, or until edges are golden-brown and centers are set. Be careful not to over-bake if you prefer chewy rather than crispy cookies! Let the cookies cool on the sheets for 3 minutes, then transfer to a wire rack to cool completely. Store cookies in an airtight container at room temperature for up to 5 days.

(Recipe adapted from Brown Eyed Baker, originally from Baking Illustrated)