Key Lime Cheesecake Bars with Gingersnap Crust

IMG_9012Today I have two matters of business to discuss with you. Since one of them involves a delicious dessert and the other happens to be a bit of bad news, there’s no question which one comes first. Dessert should always come first.

These Key Lime Cheesecake Bars with Gingersnap Crust are like a cross between key lime pie and key lime cheesecake, but in bar form. In other words, they’re smooth, creamy, and perfectly balanced between sweet and tart. Instead of a traditional graham cracker crust, this crust is made with crushed gingersnaps. I was a little leery of the ginger-lime combo at first, but one bite totally won me over. The crunchy, slightly-spicy cookie crust is an unexpected but delicious partner to the cool, creamy lime filling. Using key lime juice really makes a difference in these. You could use regular lime juice and I’m sure they would still turn out delicious, but the key lime has a more tropical, complex flavor that really takes these over the top. Bottled key lime juice will work perfectly if you don’t have access to fresh key limes (I know I don’t!) and is usually found in the unrefrigerated juice section.

IMG_9013

Celebrate the end of summer with these fantastic little bars. They’re SO much faster and easier than a full-out key lime pie (and most definitely easier than a cheesecake) but they manage to pack in all the same textures and flavors you’d expect from a more elaborate dessert. Crumbly gingersnap crust + creamy, sweet-tart key lime filling = bliss.

Second order of business: Emma’s Baking Addiction. As I’ve mentioned before, I head off to college on Monday, aka my life is going to change A LOT! Unfortunately this means that my blog will be taking the back seat for awhile. I’ll probably check in from time to time, but without access to a real kitchen and baking equipment (and my stellar photographer of a brother), there probably won’t be any new recipes for quite some time. Sad, I know. I can’t imagine that this will be the last of my blogging career, though. Although I’ve just gotten started, I love it too much to quit. Writing and baking are two of my very favorite things in the world, and I wouldn’t be surprised if I come back to food blogging later down the road.

IMG_9017

So for now, please enjoy looking back on all the posts I’ve done in the past year and keep your eyes out for my little updates. A huge thank you to all my readers!

Now to end on a happier note….see recipe below 🙂

IMG_9028

Key Lime Cheesecake Bars with Gingersnap Crust

For the crust:

2 cups finely crushed gingersnap cookies (the crispy kind)

3 tablespoons butter, melted

For the filling:

4 ounces cream cheese, softened to room temperature

4 large egg yolks, at room temperature

1 14-oz can sweetened condensed milk

1/2 cup key lime juice (I used bottled)

2 teaspoons fresh lime zest (from about 1 large lime)

Directions:

Preheat oven to 350 degrees F. Line an 8″x8″ baking pan with aluminum foil, leaving an overhang. Spray lightly with baking spray and set aside.

In a medium bowl, stir together the gingersnap crumbs and melted butter. Firmly press the mixture into the bottom of the prepared pan. Bake for 10 minutes while you make the filling.

In a large bowl, use an electric mixer to beat the cream cheese until smooth. Beat in the egg yolks one at a time, scraping down the bowl as needed. Mix in the sweetened condensed milk, key lime juice, and lime zest until well-combined. Pour the mixture into the hot crust. Bake for 18-20 minutes or until the edges are just beginning to brown and the top is set. Bars will still be slightly jiggly.

Let the bars cool on a wire rack for 1-2 hours, or until they reach room temperature. Chill the bars for at least 2 more hours, then lift them out of the pan and slice into squares. Leftover bars can be stored in an airtight container in the refrigerator.

(Recipe from Sally’s Baking Addiction)

Two-Bean Turkey Chili

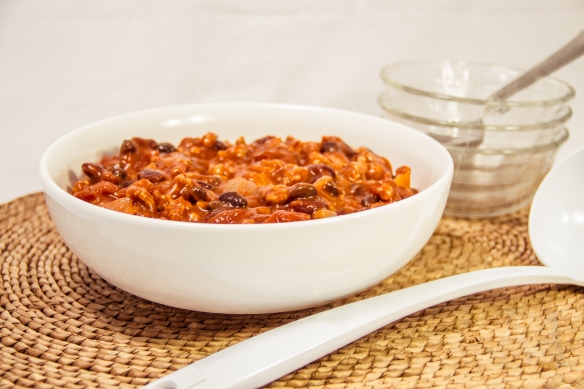
IMG_8720I know it’s August, and therefore summer, and therefore most likely broiling hot where many of you live, but I’m posting a recipe for chili today. Yes, it may feel a bit backwards to see a pot of chili simmering on the stove in the middle of August, but sometimes it’s fun to be backwards. Plus I just really, really love chili.

While it’s true that chili is one of my very favorite foods (add cornbread to the mix and we’re entering the realm of my top 5 favorite meals ever), I didn’t actually make this particular chili to be eaten. At least not right away. You see, I’m heading off to the wondrous world of college in just a few short days, leaving behind a pair of poor little empty-nested parents. I keep picturing them wandering around the house in a state of mourning, peering sadly at my stripped-down bed and noting the absence of all my neurotically-labeled “Emma” items in the fridge. (Hey, if you lived with an extremely active 18-year-old brother who, along with his equally active friends, regularly raided your fridge, you might start labeling your food, too!)

Anyway, my mind keeps drifting to all the things that will be different after I’m gone. Who will bake an endless amount of pumpkin-oriented treats throughout the fall? Who will my dad play Scrabble with now that the only other Scrabble-lover in the house is gone? Who will my mom watch soap operas and romantic comedies with now that my brother is leaving? Don’t worry, just kidding on that last one. My mom hates soap operas.

IMG_8721

One thing I do know is that I seem to be the only member of our family who was bitten by the cooking bug, at least during the school year. After a long day of teaching, the last thing my parents want is to come home and make an elaborate anything that takes longer than 15 minutes for dinner. Especially next year, when they’ll have no starving children to feed, minus our food-obsessed beagle. So I cooked up a giant pot of one of our favorites, Two-Bean Turkey Chili, and froze it in gallon-sized zip-locks to be thawed and reheated at my mom and dad’s leisure. With just the two of them, I figure it will be at least three meals’ worth. Now I know that they’ll at least have a few days where they can come home to a hot, homemade, no-fuss meal. Of course, my mom will probably start crying when she sees the bags of homemade chili in the freezer. It’s just their nature, those mothers of ours.

Since I already had the chili made, I figured I might as well post the recipe since it’s so darn good! It’s hearty yet healthy, well-seasoned yet mild, and really hits the spot on a chilly evening. Packed with ground turkey, two kinds of beans, rich tomatoes, and warm spices, this chili can do no wrong. Tuck the recipe away to pull out when the weather cools down, or make it now if you can’t wait! I wouldn’t blame you.

IMG_8715

Two-Bean Turkey Chili

Serves about 6

1 Tbs extra-virgin olive oil

1 pound lean ground turkey

1 medium onion, diced

2 large garlic cloves, minced

1 medium yellow or red bell pepper, seeded and diced

1 15-oz can black beans, drained and rinsed

1 15-oz can red kidney beans, drained and rinsed

2 14.5-oz cans diced tomatoes, undrained

2 15-oz cans tomato sauce

1 Tbs chili powder

1 & 1/2 tsp ground cumin

1/4 tsp dried basil

1/4 tsp black pepper

1 tsp salt

1/2 tsp brown sugar

Directions:

Heat the olive oil in a large pot over medium heat. Sauté the ground turkey, onion, and garlic until the turkey is cooked through, breaking up the meat along the way. Drain off any excess grease and add the bell pepper to the pot. Cook for 2-3 minutes or until the pepper is softened. Add in the beans, diced tomatoes, tomato sauce, and spices; stir well.

Bring the mixture to a boil over high heat, then reduce to a low simmer. Simmer the chili for at least 15 minutes and up to 1 hour (the longer, the better for texture and flavor). Make sure to stir the chili occasionally, scraping along the bottom. Serve with shredded cheese, chopped red onion, sour cream, crushed tortilla chips, and/or cornbread.

(Recipe slightly adapted from Mel’s Kitchen Cafe)

Lemon-Coconut-White Chocolate Chip Pudding Cookies

IMG_8769In my mind, it’s darn near impossible to mess up a cookie. Of course there are the huge, throw-away-the-whole-batch screw-ups like adding salt instead of sugar (been there, done that), losing track and measuring out one cup of flour too many (guilty again), or forgetting to set a timer and removing a pan of charred black lumps from the oven 30 minutes later, but all in all cookies are pretty forgiving. Or maybe it’s just the people that eat them. At least in my experience, the wide majority of the cookie-loving population will eat just about anything so long as it’s full of the sugar, white flour, and butter that we all know and love. Crisp, slightly dry cookies that were left in the oven just a bit too long? Don’t worry about it. Pancake-thin cookies that are just a tad too greasy? Still good. I’ve met a handful of cookie snobs in my day, but for the most part, cookies are one of the most fool-proof baked goods out there.

Regardless, even though the people I share my cookies with couldn’t care less if every cookie that passes their lips is flawless, I happen to be inflicted with the perfectionist gene. At least when it comes to certain things. (One look at my bathroom sink or the inside of my purse will claim otherwise.) Which is why I’m always on the lookout for recipes and methods that will produce perfectly soft, round, thick, chewy cookies. Thin, flat cookies may be delicious in their own way, but sometimes they just don’t cut it. Which is where this recipe comes in.IMG_8761

This pudding cookie recipe guarantees the softest, moistest, chewiest, fluffiest cookies every.single.time. None of those greasy little pancakes or dense little rocks. The secret? Dry pudding mix. Granted, I’m not a fan of using artificial ingredients, but the key is moderation in everything. Eating one five pudding cookies once in a while never hurt anyone, right? One of the best parts of this recipe is how adaptable it is. You can switch up the flavor of pudding mix and experiment with all types of add-ins: different kinds of chocolate chips, nuts, dried fruit, coconut, toffee bits, you name it. I have a Dark Chocolate Coconut version on the blog that’s phenomenal, and I’ve tried various other combinations including chocolate pudding mix with butterscotch chips and toffee bits, butterscotch pudding mix with chopped pecans, and vanilla pudding mix with classic semisweet chocolate chips.IMG_8763

All the variations I’ve tried are delicious, but this one is my very favorite. Soft, lemony dough is loaded with white chocolate chips and sweet shredded coconut and baked to perfection. I made these last year as part of a care-package for a family friend who was up fishing in Alaska, and he deemed them the “best cookies he’d ever eaten.” They’re great to send or give away as gifts because they stay perfectly soft and moist for days upon end, and the flavors just seem to intensify over time.

If you’ve never given pudding cookies a try, do so now! Use the Lemon-Coconut-White Chocolate combo as seen below or experiment with your favorite flavors. You can’t go wrong with these.

IMG_8781

Lemon-Coconut-White Chocolate Chip Pudding Cookies

Yield: about 4 dozen cookies

1 cup unsalted butter, at room temperature

3/4 cup light brown sugar, packed

1/4 cup granulated sugar

2 large eggs

1 tsp vanilla extract

1 3.4-oz package instant lemon pudding mix

2 & 1/4 cups all-purpose flour

1 teaspoon baking soda

1/2 teaspoon salt

1 & 1/2 cups white chocolate chips

1/2 cup sweetened shredded coconut

Directions:

Preheat oven to 350 degrees F. Lightly grease two cookie sheets or line with parchment paper.

Using an electric mixer, beat the butter and sugars in a large bowl until smooth. Beat in the eggs one at a time, followed by the vanilla. Beat in the pudding mix until well-combined.

In a smaller bowl, whisk together the flour, baking soda, and salt. Slowly stir the flour mixture into the wet ingredients, mixing just until combined. Stir in the white chocolate chips and the shredded coconut.

Drop the dough by rounded tablespoons onto prepared cookie sheets. Bake for 10-12 minutes or until edges are slightly golden and tops are set. Be sure not to over-bake! Let the cookies cool on the sheets for 5 minutes, then transfer to a cooling rack. Store cookies in an airtight container at room temperature.

(Recipe adapted from Two Peas and Their Pod)

Whole Wheat Zucchini Chocolate Chip Muffins

IMG_8156Is anyone else out there in utter shock that it’s already August? The sun is setting just a bit later every night, the first ripe blackberries of the season are appearing on the wild bushes all over my island, and yesterday I came home from a two-day trip to find my vegetable crisper overflowing with zucchini. It’s common knowledge that this is the time of year when every garden-owner is up to their ears in zucchini. Although my family doesn’t have a garden of our own we happen to be the lucky neighbors of a fantastic (and generous) gardener who likes to share. And who happens to be up in her ears in zucchini, of course. Works for me!

IMG_8157

While I love zucchini in many of its savory forms, including stuffed zucchini, grilled zucchini, roasted zucchini, you name it, I am of course partial to using it in my baking. It adds so much moisture, texture, vitamins and nutrients to baked goods without making them taste like a salad, and it’s so easy to use. Just pull out your cheese grater (or food processor) and shred away. Shredded zucchini can be frozen for later use, which is a definite plus for those overwhelmed zucchini-growers, but my zucchini stock never makes it that far. Not with my baking addiction being as it is.

IMG_8161

IMG_8170


First up on the zucchini list were Whole Wheat Zucchini Chocolate Chip Muffins. Usually when I make muffins (with a few exceptions, of course) I like to make them relatively healthy so that I can feel just a bit less guilty while serving them for breakfast. So naturally, there’s nearly a cup of chocolate chips in this recipe. Hah. But aside from the much-needed dose of dark chocolate (which I totally condone, even at breakfast), these are nearly guilt-free. They contain NO butter or oil, instead relying on applesauce, eggs, and zucchini to keep them moist and hold them together. There’s only 1/3 cup of refined sugar in the whole batch, and the nutritional content is boosted further with the addition of whole wheat flour and, of course, zucchini. Orange zest and cinnamon serve to give the muffins wonderful flavor in a healthy way, and while these are plenty sweet they taste like real food, not like the sugary cupcakey muffins that so many of us are used to.

IMG_8173

If you need a way to use up a bit of zucchini, definitely add these to your list. I mean, who wouldn’t want to eat zucchini in the form of a tender, flavorful, considerably healthy muffin containing a hint of fresh orange zest and warm cinnamon? And did I mention that every bite contains rich dark chocolate? That alone should have you running to the kitchen right now!

Whole Wheat Zucchini Chocolate Chip Muffins

Makes about 12 standard-size muffins or a 9″x5″ loaf*

2 cups white whole wheat flour (or 1 cup all-purpose and 1 cup whole wheat)

1 teaspoon salt

1/2 teaspoon baking soda

1/2 teaspoon baking powder

1 teaspoon ground cinnamon

1/3 cup brown sugar, lightly packed

1 teaspoon grated orange zest

1/3 cup honey or molasses (I used a mixture of both)

1/2 cup unsweetened applesauce (or vegetable oil)

2 large eggs

1 teaspoon vanilla extract

2 cups shredded, unpeeled zucchini (from about 1 medium zucchini)

3/4 cup dark chocolate chips

Directions:

Preheat oven to 350 degrees Fahrenheit. Line a 12-cup muffin tin with paper liners or spray well with baking spray.

In a small bowl, whisk together the flour, salt, baking soda, baking powder, and cinnamon. Set aside.

Place the brown sugar in a medium bowl. Add in the orange zest and use your fingers to incorporate it into the sugar. When the mixture is well-combined and fragrant, whisk in the honey or molasses, applesauce, eggs, and vanilla until smooth. Gently stir the flour mixture into the wet ingredients, mixing just until no flour streaks remain. Stir in the shredded zucchini and chocolate chips.

Scoop the batter into prepared muffin cups, filling each about 3/4 of the way. Bake for 20-24 minutes or until tops bounce back when touched and an inserted toothpick comes out clean. Let the muffins cool for 5 minutes in the tins, then remove to a cooling rack. Store leftover muffins in an air-tight container at room temperature.

*To make zucchini bread, pour the batter into a greased and floured 9″x5″ loaf pan. Smooth the top and bake for 50-60 minutes or until an inserted toothpick comes out clean. Cool for 15 minutes before inverting onto a cooling rack, then allow the bread to cool completely before slicing.

(Recipe adapted from King Arthur Flour)