Coconut-Lime-White Chocolate-Macadamia Nut Cookies

IMG_3929

So you know how just a few days ago I let you in on the fact that even though I hate picking favorites, these amazing Chocolate-Peanut Butter-Oatmeal Cookies just might be my favorite cookies ever? Well, at the risk of ruining my entire credibility and sounding totally hyperbolic every time I rave about food, I think I have to eat my words. Sorry, guys. I really really love those Chocolate-PB-Oatmeal cookies, and I really didn’t mean to negate their status as my top cookie so soon err, ever ;), but then….these cookies happened. And it was awesome.

IMG_3933

Now that Memorial Day has come and gone, and with my graduation (ahhh!) right around the corner, I feel like I have full permission to embrace all the goodness of summery treats. Think lemon, lime, berries, coconut, frozen desserts, salsas, fruity drinks, the list goes on and on! A few days ago I remembered a recipe I’d bookmarked way back in the fall, one that happened to boast an incredible combination of summer flavors that were incorporated into white chocolate macadamia nut cookies, which I’ve always had a major fondness for. Get ready for it…Coconut-Lime-White Chocolate-Macadamia Nut Cookies!

IMG_3935

As delicious as this flavor combination sounded, it tasted even better. We’ve got so much goodness going on here: the smooth, sweet white chocolate; the nutty, salty macadamias (which I toasted to bring an extra boost of flavor), the tropical-tasting coconut, and the fresh, zingy lime zest. It’s all loaded into a dough that bakes into super thick, chewy cookies. It just so happens to be the same dough recipe I use regularly to make some of the best chocolate chip cookies ever, so I knew these were gonna be good. Each bite brings a whole spectrum of tropical flavors, nutty undertones, and a myriad of textures.

IMG_3939

I love that I didn’t even have to break out an electric mixer for these! Since the recipe uses melted butter it can all be mixed by hand, as long as you’re willing to use a little elbow grease with your wooden spoon. Just call it your arm workout for the day and you’ll be justified to have an extra cookie, right? I like to rub the lime zest right into the sugar to really bring out that great citrus flavor, and I also opted to toast both the macadamia nuts and the coconut to get some extra nuttiness and texture. The melted butter, extra egg yolk, and high ratio of brown sugar to white all help make the cookies so incredibly chewy…just be careful to take these out of the oven as soon as the edges are set; otherwise you’ll end up with crispy cookies. In my book, soft and chewy cookies trump hard and crispy every time!

IMG_3932

Usher in the summer season with these loaded Coconut-Lime-White Chocolate-Macadamia Nut Cookies. If you’re like me, one bite will have you rethinking every past claim about “favorite cookies.” All you’ll be able to think about is the sweet, salty, chewy, nutty, tropical party going on in your mouth. True story.

Coconut-Lime-White Chocolate-Macadamia Nut Cookies

Makes about 24 large cookies

2 cups all-purpose flour

1/2 teaspoon baking soda

1/2 teaspoon salt

3/4 cup (12 tablespoons) unsalted butter, melted and cooled

1 cup light brown sugar, packed

1/2 cup granulated sugar

1-2 tablespoons fresh lime zest (from about 2 small limes)

1 large egg + 1 egg yolk

2 teaspoons vanilla extract

1 cup white chocolate chips

1 cup shredded coconut

1 cup macadamia nuts, roughly chopped

Directions:

To toast the macadamia nuts and coconut (if desired), preheat oven to 325 degrees F. Line a cookie sheet with aluminum foil and spread the macadamia nuts and coconut onto it. Place in the oven for about 10 minutes or until nuts and coconut are golden-brown and fragrant. Let cool.

In a small bowl, whisk together the flour, baking soda, and salt. Set aside.

Place the granulated sugar and lime zest in a larger bowl. Using your fingers, rub the lime zest into the sugar until well-incorporated. Add in the brown sugar and melted butter and stir vigorously for 2-3 minutes (or use an electric mixer). Next, beat in the egg and egg yolk, followed by the vanilla. Beat until smooth.

Stir the dry ingredients into the butter/sugar mixture, stirring just until combined. Stir in the white chocolate chips, toasted coconut, and toasted macadamia nuts. Chill the dough for at least 1 hour.

When ready to bake, preheat oven to 350 degrees F. Scoop the chilled dough into 2-tablespoon-sized balls and place on a lined or greased cookie sheet 3 inches apart. Bake for 12-14 minutes or until edges are set but tops are still soft and puffy.

Let the cookies cool on the sheets for 5 minutes before removing to a cooling rack. Enjoy!

(Recipe slightly adapted from Our Best Bites)

Chocolate-Peanut Butter-Oatmeal Cookies

IMG_3922Before anything else, I feel as though I must warn you. This warning is not to be taken lightly and should be adhered to by all costs: Do not, I repeat, DO NOT taste this cookie dough. Seriously. Because if you start, you most likely will not be able to stop. One tiny taste will lead to another, and another, and before you know it you will have an empty bowl and a horrible stomachache and no delicious cookies to share with your friends and family or hoard for yourself or sneak to your dog and your life will be ruined and you’ll blame me and I can’t have that happening, now can I? So please, unless you’re an absolute master of self-restraint, keep your fingers out of the bowl. It’s a slippery slope, guys, a slippery slope indeed.

IMG_3924

I first tried these cookies about seven years ago, when our good friend Emily delivered them as a thank-you. My whole family went nuts over them and immediately requested the recipe. I remember my dad describing the cookies as “a meal in themselves,” and they really are. A tall glass of milk is definitely necessary when eating one of these! Cocoa powder, peanut butter, oats, chocolate chips, peanut butter chips…these cookies are absolutely ridiculous in the best way possible. I’m kicking myself for having let the recipe get away from me for so many years. Taking a bite of one of these big, warm, chewy cookies fresh out of the oven tempted me to declare them my “favorite cookie ever.” This is a label I do not use lightly, but these cookies just might be worthy. They really are incredible…not overly sweet, full of so many great flavor/texture combos, and ultra thick and chewy.

IMG_3914

Get ready to experience what may very well become your new favorite cookie. These aren’t for the faint-hearted…with dough loaded up with cocoa, peanut butter, oats, semisweet chocolate AND peanut butter chips, these are definitely on the rich side! The  oats, darker chocolate, and salty peanut butter help keep things from getting too sweet (if there is such a thing!) and they’ve got a wonderfully hearty texture thanks to the oats. And the smell of these cooking? Heavenly. Just remember what I said about sampling the dough, because one bite and it’s game over. Patience is virtue, and the end result is so very worth it. Of course, once the dough balls are formed and safely inside the oven, I can’t say you shouldn’t lick the bowl clean. Your choice, not mine :).

IMG_3921_2

Baked or not, these cookies are seriously awesome. So much goodness going on. Make them, eat them, savor them. I’ll stop raving and just give you the recipe now…you know you want it!

IMG_3927

Chocolate-Peanut Butter-Oatmeal Cookies

Yield: about 36 cookies

1 cup unsalted butter, at room temperature

1 cup granulated sugar

1 cup light brown sugar, packed

3/4 cup creamy peanut butter

2 large eggs

1 tsp vanilla extract

2 cups all-purpose flour

1/4 cup unsweetened cocoa powder

2 tsp baking powder

1/2 tsp salt

1 cup semisweet chocolate chips

1 cup peanut butter chips (or swap for more chocolate chips)

1 & 1/2 cups quick-cooking oats (not instant!)

Directions:

Preheat oven to 350 degrees F. Line or grease baking sheets and set them aside.

In a large bowl, using an electric mixer, beat together the butter, sugars, and peanut butter until smooth and creamy. Beat in the eggs one at a time followed by the vanilla, scraping down the bowl as needed.

In a smaller bowl, whisk together the flour, cocoa powder, baking powder, and salt. Gradually add the dry ingredients into the butter/sugar mixture just until combined. Stir in the chocolate chips, peanut butter chips, and oats.

Form dough into balls that are about 2 tablespoons large and place onto prepared cookie sheets 3 inches apart. Slightly flatten each ball to make them about 3/4-inch thick.

Bake for 12-14 minutes or until edges are set and tops are no longer shiny. Be careful not to over-bake! Let cookies cool for 5 minutes on baking sheets before removing to a wire cooling rack.

(Recipe from our family friend Emily)

Thick & Fluffy Gluten-Free Pancakes

IMG_3897

Growing up, pancakes were a frequent occurrence in our house, especially on weekend mornings. I vividly recall standing on my little stool next to the stove, taking on the oh-so-important task of placing frozen blueberries onto each round circle of batter and trying to exercise patience as they cooked for what seemed like a million years. My dad must have listened to my shrill little voice asking “Are they ready now? Now, dad? Now?” about a gazillion times. While my mom was always the chef behind our morning oatmeal, waffles, and scrambled eggs, I remember my dad being in charge of pancakes, boiled or fried eggs, omelets, and french toast. It’s funny what memories a young brain holds on to: which parent cooked what breakfast, how many times I sneakily attempted (unsuccessfully) to eat all the cheese out of my omelets and get away with leaving the egg part untouched, and the painful shock of burning my index finger on a hot pancake skillet the one time I broke all headed warnings and gingerly “tested” the pan to affirm that yes, indeed, it really does get HOT! Lesson learned.

It’s been literally years since my family has all had a pancake breakfast together, and to be honest I’m no longer a huge fan of pancakes themselves, but this weekend I decided to dredge pancakes up from the forgotten breakfast arsenal and cook up some gluten-free pancakes that everyone (since my mom is gluten-free) could eat.

This recipe for Fluffy Gluten-Free Pancakes was a jackpot! Contrary to my fears of gluten-free pancakes ending up gummy, grainy, or just plain gross, this recipe yielded soft, tender, dense-yet-fluffy, delicious pancakes. Made with a combination of oat flour and coconut flour, the pancakes are hearty and thick with a wonderful slightly-sweet coconut aroma, and with a few tablespoons of honey and a dash of vanilla they’re plenty sweet as-is. That said, they’re also delicious drenched in pure maple syrup! The Greek yogurt gives the pancakes moisture and fluffiness, and the eggs counteract coconut flour’s tendency to make finished products dense and gummy rather than tender and moist. Kudos to Honey and Brie for an awesome recipe!

IMG_3901

While these pancakes are fabulous without any add-ins or extra flavors, I imagine they would be a perfect template for blueberry pancakes, chocolate-chip pancakes, banana-nut pancakes, or some other variation. I know I’ll be making these again since everyone in my family (even my pancake-neutral self) loved them! In fact, they were our breakfast Saturday AND Sunday morning. Gluten-free doesn’t have to mean pancake-free! These are super tasty, my friends, whether you’re gluten-free or not. Enjoy!

IMG_3899

Fluffy Gluten-Free Pancakes

Makes about 6 (thick!) 4-inch pancakes

1/2 cup + 1 tablespoon oat flour

2 tablespoons coconut flour

1/2 teaspoon baking soda

Pinch of salt

1 teaspoon vanilla extract

2 large eggs

1/2 cup Greek yogurt (or any type of plain yogurt)

2 tablespoons honey, pure maple syrup, or agave nectar

Butter, maple syrup, fresh fruit, etc. to serve

Directions:

In a medium bowl, whisk together the oat flour, coconut flour, baking soda, and salt. Whisk in the vanilla, eggs, yogurt, and honey until smooth. If the batter is too thick, add in about 1-2 tablespoons of milk.

Melt a little butter into a skillet (or spray with nonstick cooking spray) over medium heat. When the pan has heated, pour 4 circles of batter onto the pan, about 1/4-cup each. When bubbles form on the tops and the edges look set, flip each pancake. Cook for 2-3 more minutes or until bottoms are golden-brown, then serve. Repeat with remaining batter.

Top pancakes with butter, syrup, fresh fruit, peanut butter, etc. and enjoy!

(Recipe adapted from Honey and Brie)

Soft Vanilla Peanut Butter Cup Cookies

IMG_3893These cookies….oh boy, these cookies. I’m not sure where my inspiration for these came from; all I know is that it came. My favorite soft vanilla pudding cookie dough (same recipe as these awesome Dark Chocolate Coconut Pudding Cookies) is baked in a miniature muffin tin, then miniature Reese’s cups are pressed into each cookie while they’re still hot out of the oven, letting the peanut butter cups melt into the still-soft cookies. After the chocolate cools back down to room temperature, you are left with 24 tiny pieces of heaven. Incredibly soft, sweet vanilla cookie shell on the outside, and creamy chocolate peanut butter cup in the middle. Be still, my heart.

I half-expected to over bake the cookie shells like I always seem to do, which makes for cookie cups that are delicious albeit a little crunchy/crumbly, but this time I made sure to pull the pan out after no more than 8 minutes, when the cookies were just barely turning golden around the edges. The cookies will be very soft and melty while they’re still warm, so I recommend letting them cool completely before attempting to remove them from the pan. To speed things up a little, I stuck the pan in the freezer for about 10 minutes, then used a butter knife to carefully remove each cookie cup. At room temperature, the cookie shell is still perfectly soft and chewy and the peanut butter cup is nice and soft as well, making it way too easy to eat these babies in one delicious bite. Which is a good thing. I think.

IMG_3891

Sometimes the most delicious of desserts are the simplest. Nothing fancy here, certainly nothing to brag about in the health department (but like I always say, moderation is key), just wonderful little bite-sized pieces of goodness. Note that the cookie dough recipe will make way more than 24 cookie cups (about 7-8 dozen total), but you don’t have to use all the dough at once. After filling up my miniature muffin pan with the vanilla dough I stirred some white chocolate chips and coconut into the leftover dough, scooped it into balls, and froze them in a tupperware for a quick and easy cookie fix. When you’re ready to bake, just preheat the oven to 350, place the frozen dough balls on lined cookie sheets, and bake for 10-12 minutes or until done. Two different desserts out of one recipe!

Peanut butter cups never tasted so good. Neither did my vanilla pudding cookies, for that matter. Soft, chewy, full of vanilla/chocolate/peanut butter flavor, mighty addictive, and pretty darn cute, these just might be my new favorite cookie. At least until another inspiration comes my way, that is!

IMG_3890

Soft Vanilla Peanut Butter Cup Cookies

1 cup (2 sticks) unsalted butter, at room temperature

3/4 cup light brown sugar, lightly packed

1/4 cup granulated sugar

2 large eggs

1 tsp vanilla extract

1 3.4-oz box instant vanilla pudding mix

2 & 1/4 cups all-purpose flour

1 tsp baking soda

1/2 tsp salt

24 miniature Reese’s peanut butter cups, unwrapped

Directions:

In a large bowl, beat the butter on low speed until creamy. Add in the sugars and beat until light and fluffy. Add in the eggs one at a time, scraping down the bowl as needed, followed by the vanilla. Beat in the pudding mix until the mixture is well-combined.

In a smaller bowl, whisk together the flour, baking soda, and salt. Slowly stir the flour mixture into the wet ingredients, mixing just until combined. Chill the dough for at least 30 minutes or freeze for 10 minutes.

When ready to bake, preheat the oven to 350 degrees F. Grease a 24-cup miniature muffin pan. Scoop the cold dough into 12 balls, 1 rounded tablespoon each, then cut each ball in half. (There will be leftover dough). Place one dough half in each mini muffin cup. Bake for 6-8 minutes, or until cookies are just turning golden-brown. Don’t over-bake!

While the cookie cups are still warm, press an unwrapped Reese’s cup into each muffin cup. Let the cookies cool for several minutes in the pan before carefully removing with a spoon. Serve.

*Note: the process can be repeated to use up all the dough (it will make 7-8 dozen cookie cups), or you can form the leftover dough into balls and freeze for future use.

Lentil and Sweet Potato Soup with Spinach

IMG_3884

Despite it being mid-May, recent weather around here has been more of a throwback to winter than a peek to the summer months ahead. This weekend has been one of those gray, drizzly, what-can-you-expect-it’s-the-Pacific-Northwest type of weekends, which means digging my windbreaker back out from the depths of my closet where I’d hoped it would stay until fall, having no opportunity to work on my (slightly pathetic) tan, and spending two long days either inside trying to find something to do or outside wishing the sun would make even a brief appearance. The only thing such a bleak weekend seems to be good for is soup-making, of course!

During the chilly fall and winter months, my family eats soup, stew, or chili at least once a week, often more. There’s something so comforting about a large pot simmering on the stove, ready to warm everyone up. Even though it’s spring, I figured I’d take advantage of the ugly weather to justify one last soup day before it gets too hot. Not that I’d mind sacrificing my favorite winter meal for a couple months of nice weather!

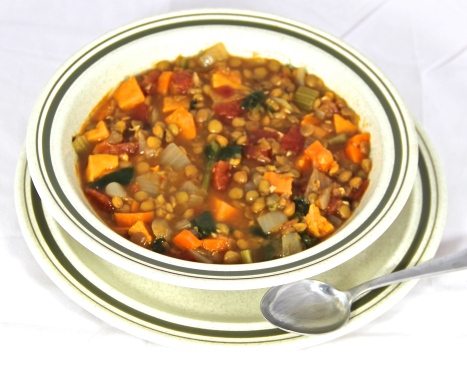
This Lentil and Sweet Potato Soup with Spinach is always a good choice. Delicious, filling, healthy, and packed with protein and veggies, it makes for a perfect dinner, especially when paired with a crusty loaf of bread. This meatless dish is full of tender vegetables and garlic; hearty lentils; fragrant thyme, rosemary, and bay leaf; and sweet tomatoes. Note that the recipe makes a LARGE pot of soup, about 10 servings, so plan on lots of tasty leftovers. The soup freezes well, too, and makes for an easy thaw-and-serve dinner.

I guess there is a silver lining to dreary, overcast days. With a bowl of this soup, it’s hard not to be a happy camper!

IMG_3881

Lentil and Sweet Potato Soup with Spinach

Serves 8-10

1 tablespoon olive oil

1 medium white or yellow onion, diced

3 large garlic cloves, minced

1 large carrot, peeled and diced

1 celery stalk, diced

2 small sweet potatoes, peeled and cut into 1/2-inch cubes

1 & 1/2 cups brown lentils

60 ounces (4 15-oz cans) vegetable broth

2 cups water

2 15-oz cans diced tomatoes

1 tsp dried thyme

1 tsp dried rosemary

2 dried bay leaves

1/4 tsp black pepper (more to taste)

1 tsp sea salt (more to taste)

2 cups fresh baby spinach leaves, torn

Directions:

Heat the oil in a large soup pot over medium heat. Add in the onion and garlic and sauté for 3-5 minutes or until onion is tender. Add in the chopped carrot, celery, and sweet potatoes and cook for 5-7 minutes, stirring frequently, or until vegetables are beginning to soften. Add in the lentils, broth, water, and diced tomatoes; stir well. Stir in the thyme, rosemary, bay leaves, salt, and pepper.

Bring the soup to a boil over high heat, then reduce to low and let the soup simmer for 35-40 minutes, or until lentils and sweet potatoes are tender. Turn off the heat and immediately stir in the fresh spinach until wilted. Taste for salt and pepper, remove bay leaves, and serve.

(Recipe adapted from Two Peas and Their Pod)

Oatmeal Lemon Creme Bars

IMG_3877Years ago, before I was a bona fide baker (although whether I am even now depends on your definition 🙂 ), I often used baking mixes. Felt like it was a perfect morning for muffin-making? I would pull out a trusty Krusteaz box. Had a hankering for brownies? Pillsbury it was (the type with the chocolate syrup pouch, of course.) Cupcakes needed for a bake sale? Hello, Betty Crocker. The fall-back line seems to be that pre-packaged mixes are faster and easier than from-scratch recipes, but in all honesty you really don’t save that much time using mixes. Unless the project at hand is something like homemade cinnamon rolls or a particularly tricky candy, it’s almost as quick to mix up a batch of homemade brownies or cookies than to succumb to a chemical-laden, artificially-flavored box mix. In my humble opinion, baking from scratch is often cheaper, yields a better-textured and better-tasting product, and allows for much more variety in your baking. Well there’s my two cents! Now we can get down to business :).

I originally found this recipe for Oatmeal Lemon Creme bars off the Betty Crocker website. The combination of crumbly oatmeal cookie and creamy lemon filling sounded utterly amazing, and I just knew I had to try them. However, the recipe called for a pouch of Betty Crocker oatmeal cookie mix, an ingredient which: a) would force me to eat my words about the evils of pre-packaged mixes and b) is unavailable at my two tiny grocery stores. They’ve got chocolate chip cookie mix, peanut butter cookie mix, sugar cookie mix, and molasses cookie mix, but no oatmeal cookie mix. Go figure! Not that I actually looked, of course, because that would mean that I was actually considering buying a mix. Which would be ludicrous, right? Um, right.

Lucky for me, a quick google of “Oatmeal Lemon Creme Bars” brought up a whole list of sites that had adapted the same Betty Crocker recipe, many of which included a from-scratch option for the cookie dough. Yay, internet! Happy that I could still try those glorious Oatmeal Lemon Creme Bars, I whipped them up in no time at all.

IMG_3876

For such a simple recipe, these sure take the cake (or should I say bar)! Their slightly crumbly, slightly crisp, not-too-sweet oatmeal top and bottom sandwich a smooth, creamy, lemony filling for a killer flavor (and texture) combination. The lemon flavor is definitely present but isn’t overpowering thanks to the thick, cheesecake-like filling and oatmeal cookie layers. Soooo good. I have to say the bars are best after being chilled, so that the filling can firm up a little and the crust gets nice and chewy, but they are delicious at room temperature as well. You really can’t go wrong! These are a perfect low-maintenance yet stellar dessert to bring to potlucks, parties, meetings, etc. or to just enjoy at home. This won’t be the last time these wonderful little bars appear at my house!

IMG_3874

Oatmeal Lemon Creme Bars

For the oatmeal cookie dough:

1 & 1/3 cups all-purpose flour

1 tsp baking powder

1/2 tsp salt

1 cup old-fashioned oats

1/2 cup (1 stick) butter, softened but still cool

1 cup light brown sugar, lightly packed

For the lemon creme filling:

1 14-oz can sweetened condensed milk

1 Tbs lemon zest (from about 1 large lemon)

1/4 cup fresh lemon juice (from about 1 large lemon)

Directions:

Preheat oven to 350 degrees F. Grease an 8″x8″ glass baking pan; set aside.

In a large bowl, cream together the butter and brown sugar until light and fluffy. Whisk together the flour, baking powder, salt, and oats in a smaller bowl. Stir the dry ingredients into the butter/sugar mixture until combined. Press a little more than half of the dough into the bottom of the prepared pan and bake for 15 minutes.

While the bottom layer is baking, stir together the sweetened condensed milk, lemon zest, and lemon juice in a small bowl until smooth. When the crust is finished baking, pour the lemon creme over the hot crust, smoothing the top with a spatula. Crumble the remaining cookie dough over the lemon creme and bake for an additional 25 minutes, or until crust is light golden.

Let the bars cool completely before slicing into squares. Store in an airtight container in the refrigerator.

(Recipe inspired by Betty Crocker, cookie dough recipe from Sally’s Baking Addiction)

Dark Chocolate Coconut Flour Cookies (Gluten-free!)

IMG_3869

Last weekend I got a chance to use up some of the oat flour that was sitting around in my pantry, but that still left several opened bags of other gluten-free flours: sorghum, tapioca, and coconut. The avid coconut-lover in me resulted in coconut flour being selected as the next flour up to bat, and I baked it into these fabulous Chocolate Coconut Flour Cookies.

Made with dark, rich cocoa powder, coconut sugar (if you can find it), and of course coconut flour, these were one of the best gluten-free cookies I’ve ever made. The coconut flour (which smells amazing, by the way), has a super-cool thickening quality that allows it to soak up moisture in batters, doughs, etc. and create a wonderfully soft, chewy product. These cookies are indeed dense, chewy, rich, and packed with dark chocolate flavor. Just like the best kind of brownie, but in cookie form. The coconut flavor is more subtle, but with a sprinkle of shredded coconut on top and the use of coconut sugar in the dough, the cookies get a perfect hint of tropical coconut flavor.

IMG_3872


If you happen to have any coconut flour hanging around your pantry, make these chocolatey coconut cookies! Heck, even if you don’t have any coconut flour, run to the store and buy a bag, because you don’t want to miss out on this recipe. Dark chocolate + coconut is truly a match made in heaven. A heavenly combination that is then baked into soft, chewy, rich, brownie-like cookies. Are you sold yet? Ready to bake? Good.

….on a completely unrelated note, someone super cute climbed into my soft box to have her portraits taken. Either that or to scarf down a few stray cookie crumbs. You know, considering that this little dog is the most food-obsessed being I have yet to encounter in my 18.75 years of life, I’m taking a wild guess that it was the latter!

IMG_3864

Dark Chocolate Coconut Flour Cookies

Makes about 18 cookies

1/4 cup (1/2 stick) butter, softened (I used Earth Balance vegan margarine sticks)

3/4 cup coconut sugar (or granulated sugar)

2 medium eggs

1/2 tsp vanilla extract

1/3 cup cocoa powder (I used Hershey’s Special Dark)

1/4 cup coconut flour

1/2 cup chocolate chips (optional)

1 Tbs unsweetened shredded coconut

Directions:

Preheat oven to 350 degrees F. Line two baking sheets with parchment paper or silicone mats and set aside.

In a large bowl, use an electric mixer to cream the butter and sugar until light and fluffy. Add in the eggs one at a time, scraping down the bowl as needed. Beat in the vanilla and mix until smooth.

In a smaller bowl, whisk together the cocoa and coconut flour. Stir the dry ingredients into the butter/sugar mixture just until combined. Stir in chocolate chips if desired. The batter will be quite thin. Let the batter sit for 5 minutes so that the coconut flour can absorb the liquid and thicken.

Drop the dough (which will be sticky) by rounded teaspoonfuls on the lined cookie sheets, leaving 2 inches between each cookie. Sprinkle each ball with shredded coconut and bake for 13-15 minutes or until cookies are just set. Let the cookies cool for 5 minutes on the sheets before transferring to a wire cooling rack.

(Recipe adapted from Whole Foods)

Banana Oat Flour Muffins (Gluten-free!)


IMG_3860Being a creature of habit, I eat almost the same breakfast every single day: oatmeal. I love it for being quick, easy, healthy, wholesome, delicious, inexpensive, and incredibly versatile when it comes to add-ins. That’s a whole lot of plus factors for one single food! Even though I almost always eat oatmeal in the mornings, I like to mix things up when it comes to toppings. Some days I go for chopped apple, cinnamon, and a drizzle of maple syrup, while other days I’m in the mood for classic blueberries & honey, the combo that I always went for when I was little. I love adding raisins, chunks of pear, sliced strawberries, really any type of fruit! My favorite combo, however, is diced banana, cinnamon, and nutmeg. The hot oatmeal warms the banana and you end up with a bowl of hot, sweet, warmly spiced deliciousness. I know, I know, I’m weird. What can I say, I like my oatmeal! 🙂

On the busiest of busy mornings, even oatmeal can be too time-consuming. That’s where this wonderful little recipe comes in! These Banana Oat Flour Muffins are basically a grab-and-go version of oatmeal: chock full of hearty oats and oat flour, a splash of milk, and some add-ins/flavorings of your choice. That’s it!! I made these without any sugar at all (not counting the banana and raisins) and they were still plenty sweet in my mind. Especially if you’re enjoying these for breakfast, the extra sweetness really doesn’t seem necessary. As far as the other ingredients go, just use your favorite oatmeal additions! I of course went for my favorite banana/cinnamon/nutmeg combo, along with a little almond flavoring, but the possibilities are endless: try using unsweetened applesauce in place of the banana, vanilla extract instead of the almond, any type of dried fruit instead of the raisins, or a little peanut butter. You could add a couple tablespoons of cocoa powder for an extra-delicious chocolate version, too! Maybe I’ll experiment with a cocoa/peanut butter/banana edition the next time I make these….and there will definitely be a next time!

IMG_3854

Oatmeal-lovers and muffin-lovers alike are bound to LOVE these babies! The muffins also freeze very well, so you can make a big batch and simply grab one out of the freezer in the morning, nuke it in the microwave for a few seconds, and enjoy a quick, healthy, yummy breakfast on-the-go. What more can you ask for?

IMG_3858


Banana Oat Flour Muffins

2 cups oat flour

1/2 cup old-fashioned oats

2 tsp baking powder

1/2 tsp ground cinnamon

Pinch of ground nutmeg

1 large ripe banana, mashed

1 cup milk (I used vanilla almond milk)

1/2 tsp almond extract or vanilla extract (optional)

1/4 cup brown sugar*

1/2 cup raisins

Topping:

1 Tbs brown sugar, packed

1/2 tsp ground cinnamon

Directions:

Preheat oven to 375 degrees F. Grease a 12-cup muffin tin or line with paper muffin cups. Set aside.

Whisk together the oat flour, oats, baking powder, cinnamon and nutmeg in a large bowl. In a smaller bowl, mix together the mashed banana, milk, almond extract, and brown sugar until well-combined. Pour the wet ingredients into the oat mixture and stir until just combined. Fold in the raisins. The batter will be thick.

Scoop the batter into prepared muffin tins. In a small bowl, mix together the 1 tablespoon of brown sugar and 1/2 teaspoon of cinnamon. Sprinkle over the muffins.  Bake for 12-15 minutes or until an inserted toothpick comes out clean and muffin tops bounce back when lightly pressed. Let cool for 5 minutes, then transfer muffins onto a cooling rack. Serve.

Leftovers can be frozen or stored in an airtight container at room temperature.

*You can make these muffins sugar-free by simply leaving out the brown sugar. I made these with no sugar at all except that from the banana, vanilla almond milk, and raisins, and they turned out delicious. However, if you aren’t used to eating less-sweet muffins, I would recommend including the brown sugar.

(Recipe adapted from Happy Herbivore)