Butterscotch Browned Butter Blondies

bbb4Bear with me here, okay? The last ten days have been a whirlwind of packing boxes, saying see-you-laters, driving, unpacking, saying hello-agains, setting up a mini-apartment, and starting new classes. I’ve started round 2 of this crazy thing called college, and once again I am reminded that yes, it is possible to simultaneously hate change and love it, and to feel approximately 10,000 emotions all at once. So I’m sorry for the brief hiatus from baking, but I’m sure you kind souls will understand!

The bad news is that my super-talented photographer brother is far far away in Montana (sniffle), so my baked goods no longer have the luxury of being beautified and clarified by his mad skills. Instead, we get my not-so-talented iPhone photos. Let’s just say that beauty and clarity are not the first two adjectives that come to mind when I look at them! We all know that we eat with our eyes, so just use your imagination and trust that these blondies taste even more delicious than they look.

The good news, on the other hand, is that this year I’m lucky enough to be living in an  apartment-style dorm with two of my best friends (and one super-friendly new roommate), which happens to have its own little kitchen! We also have four (tiny) bedrooms, two bathrooms, four bathroom sinks, a little living room, a TV, a VCR (yes, those things still exist!), and a fake potted plant featuring our two plastic flamingos, Mushu and Lulu (long story). (As you can tell, my obsession with parenthesis continues.)bbb3

Compared to last year’s standard freshman experience (i.e. living in what felt like a cubicle, carrying a shower kit to and from the bathroom every day, and eating way too much cafeteria food) I’m living a life of luxury. I couldn’t wait to break in our new kitchen, so as soon as my last class was over on Friday I made a quick trip to Safeway for ingredients and got straight to work.

While cookies are my usual go-to, we only have one cookie sheet and zero electric mixers, so I opted instead for cookie bars aka blondies. I knew I could just use melted butter since blondies are baked in a pan and won’t spread like cookies, and I also just really love blondies. Since I was already melting the butter I went ahead and browned it, which is never ever ever a bad decision ever. Browned butter gives whatever it’s in a nutty, caramel-y depth of flavor and it makes your kitchen smell amazing for hours!bbb2

Apart from browning the butter, which really isn’t that hard, this recipe is about as simple as it gets. I used one bowl, one spoon, and one pan, which I lined with parchment paper for easy clean-up. Very do-able for tiny apartments and limited supplies! I chose to add in chocolate chips, butterscotch chips, and a dash of cinnamon, but you can think of this recipe as a base for whatever type of bars you fancy. I’ve made them in the past with shredded coconut, white chocolate chips, and chopped nuts, and in my option the more loaded they are, the better! Hopefully everyone shares this opinion, since I halved the original recipe and forgot to halve the chips, meaning they were very, um, chippy. No one seemed to mind :).

It felt so good to be back in the kitchen after a crazy week! There’s something about the predictability of measuring, mixing, and baking that’s incredibly comforting, which is part of the reason I love to bake so much. It also brings back memories, provides a sense of focus, allows for creativity, and best of all, results in delicious things! Baking addict forever <3.

Enjoy these Butterscotch Browned Butter Blondies, everyone! Say that five times fast.bbb5

Butterscotch Browned Butter Blondies

Makes about 16 bars

1/2 cup (1 stick) butter

3/4 cup brown sugar, packed

1/4 cup granulated sugar

1 large egg

1/2 teaspoon vanilla extract

1 cup all-purpose flour

1/2 teaspoon baking powder

1/4 teaspoon baking soda

1/4 teaspoon salt

1/2 teaspoon ground cinnamon (optional)

1/2 cup butterscotch chips

1/2 cup semisweet chocolate chips

Directions:

Preheat oven to 325 degrees F. Line (or grease) an 8×8″ baking pan with parchment paper, leaving a 2-inch overhang. Set aside.

Place the butter into a small saucepan and melt over medium heat. Let it cook for about 5 minutes, whisking constantly, until it turns dark golden-brown and smells nutty and fragrant. Be careful to stop as soon as the butter is browned, because it can quickly burn! Set the browned butter aside to cool as you prepare the dry ingredients.

In a medium-sized bowl, whisk together the flour, baking powder, baking soda, salt, and cinnamon. Set aside.

Add both sugars to the slightly cooled butter (you can just mix it all in the saucepan), whisking until smooth. Whisk in the egg and vanilla until smooth and glossy. Gently stir in the dry ingredients, mixing just until no flour streaks remain. Stir in the butterscotch and chocolate chips.

Scrape the batter into the prepared pan. Bake for 35-40 minutes, or until an inserted toothpick comes out clean. Cool completely before slicing into bars.

(Recipe adapted from Brown Eyed Baker)


Silken Chocolate Fudge Pie

IMG_4553Secret ingredients are my favorites. I love being on either end of the guessing game: the eater or the maker. I know that many people run away screaming when they’re approached with a mystery food and the claim that they’ll “never ever guess what’s in it,” but I’m certainly not one of them. I love finding out that the seemingly innocent chocolate pudding given to me with a sly grin was made out of avocado, cocoa powder, and coconut sugar; on the flip side I find it largely entertaining to watch my family try to guess what gives my black bean chili a certain depth of flavor, never suspecting that the answer is a trio of pumpkin, cinnamon, and cocoa powder. Whether it’s a dash of cinnamon in a homemade cherry pie or a can of black beans in a batch of flour-less brownies, I’m always excited to try out a recipe made with something you’d never expect.IMG_4556

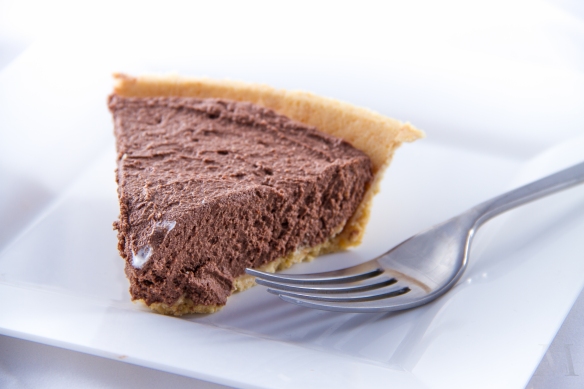
This Silken Chocolate Fudge Pie can easily fool you into thinking it’s sinful. Its smooth, rich chocolatey filling tastes just like (a really good) chocolate cream pie, and it manages to be firm yet airy at the same time. I’m pretty confident that I could have eaten the entire pie if I let myself, especially when topped with a dollop of whipped cream! The best part is that even though this pie may look and taste like a dessert packed with sugar, cream, and butter, it’s surprisingly healthy!IMG_4566

Made with a short list of ingredients that are simply thrown into a food processor and blended, this pie is incredibly quick and easy. It doesn’t even need to bake! There’s no gluten or dairy involved, and in this case the sneaky little wonder ingredient is…tofu! Stick with me here. I know lots of people turn up their noses at tofu, hating on its bland mild taste and unappealing acquired texture, but in this pie it is virtually undetectable. It manages to give the pie its firmness without adding any funky aftertastes so that all you end up tasting is rich, delicious chocolate.IMG_4574

The rest of the ingredients aren’t scary at all: milk, cocoa powder, vanilla, salt, and melted chocolate. I was feeling rebellious and decided to ruin the healthiness of it all by pouring the filling into a store-bought shortbread crust (and possibly going so far as to top it with Cool Whip), but you could definitely make your own pie crust or just pour it into little ramekins and serve as a custard-y dessert. Firm tofu will create a more traditional pie that holds together well, but if you want a more mousse-like pie or  a crustless pudding, just use soft tofu. Ten points to tofu for its versatility….yet another reason it’s such a star in this recipe!IMG_4583

So, the next time you catch yourself with a chocolate craving, go the healthy route and whip up this chocolate pie! It’s guaranteed to satisfy your sweet tooth without the extra baggage of junky ingredients, and it’s also fun to serve to unsuspecting friends. I bet they’ll never guess it’s made with tofu…I know I wouldn’t have!IMG_4576

Silken Chocolate Fudge Pie

10 ounces semisweet chocolate chips

12.3 ounces firm tofu*

2 tablespoons milk (soy, almond, etc. all work fine)

1 teaspoon unsweetened cocoa powder

1 teaspoon vanilla extract

Pinch of salt

2 tablespoons granulated sugar or agave nectar (more or less to taste)

1 pre-baked pie shell

Whipped cream (optional)

Directions:

Melt the chocolate chips in the microwave or in a double boiler, stirring until smooth. Place all the other ingredients into a food processor or high-powered blender and scrape in the melted chocolate. Blend or process until very smooth. Mixture will be thick.

Pour the filling into the prepared crust and refrigerate for at least 2 hours. The longer it chills, the firmer it will be (I chilled mine overnight). Slice and serve, topped with whipped cream if desired.

*For a softer, mousse-like pie, use soft/silken tofu rather than firm

(Recipe adapted from Chocolate Covered Katie)

Wild Blackberry Pie

IMG_4054When my brother and I were about seven years old, my parents decided to convert our backyard sandbox into a miniature strawberry patch. Considering that no one in my immediate family was (or is) much of a gardener, this was a pretty big deal. At that point, the closest I’d ever come to home-grown food was the handful of gnarly apples that our ancient little tree managed to produce every other year and the crazy mass of rhubarb that grew around our sandbox-turned-strawberry-patch. Compared to our across-the-street neighbors’ perfectly trim, maintained vegetable garden, our 3’x5′ strawberry box wasn’t exactly impressive, but that didn’t stop my brother and me from running out to the yard every day to check on our strawberries’ progress.

The first few years were pretty disappointing…only a couple of teeny-tiny (yet sweet!) berries appeared among the leaves, which we quickly gobbled up. Each year seemed to be a bit better, though, and by the time we put our house up for sale in 2003 our strawberry patch had quite a few juicy red berries to boast. Of course it happened that just when our little plant was starting to thrive we had to pack up and leave….but isn’t that the way it always seems to go? Sigh.

Still, even those tiny red sandbox strawberries taught me an important lesson…garden-grown produce is not in the same league as store-bought. Not even close. It goes for anything: berries, tomatoes, lettuce, beans, carrots, you name it! I love this time of year when the farmer’s market is in full swing and our green-thumbed friends and neighbors gift our family with “real” fruits and veggies. It’s also the time of year for blackberry picking, one of my favorite parts of summer!IMG_4069

When we first moved to the area and discovered it teeming with wild blackberry bushes I was beside myself with the excitement of berry-picking. I loved the rustic feeling of heading down the driveway with a bucket swinging from my hand, plunking in berry after berry to the point of near-overflow. I never minded all the scratches that covered my wrists and shins after a session of blackberry picking; it was all worth it to get that perfect patch of berries tucked among the thorns. I always felt a little like Laura Ingalls Wilder, collecting a bounty of wild blackberries to bake into pies and eat over porridge (aka oatmeal).

To this day I’m still a berry-picking fanatic. I often venture down to the best bushes on our road after dinner and fill a bowl or two with ripe, gigantic blackberries. Secretly I love to close my eyes and just breathe in the smell of them. It brings back a flood of memories of hot summer days at our county fair, pie-baking with my friends, and squeezing in one last trip to the bushes on the night before the first day of school. This year I went a little crazy and had to fill three gallon-size ziplock bags with blackberries to freeze since there’s only so many that my family can eat up while they’re fresh. I also made sure to bake a blackberry pie, which my dad has deemed his favorite pie in the world.

The quality of a pie is largely determined by the quality of the fruit inside it, and that’s what makes my wild blackberry pie extra-delicious. I never buy blackberries from the store since they grow so plentifully around here, but earlier this year I had store-bought blackberries at a friend’s house and was shocked by the difference in flavor. All I can say is that those seedy little berries in the plastic containers are not real blackberries. Wild blackberries are so much sweeter, softer, juicier, and more fragrant that I can’t even think of them as the same fruit. Sorry to diss the store-boughts, but it’s the cold hard truth!IMG_4071

While I’ll never say no to a fresh blackberry straight off the bush, sprinkled into a fruit salad, or served over vanilla ice cream (gah), they really shine in this pie. The filling is kept simple to let the blackberries dominate, but the flavors of bright lemon and warm vanilla add a perfect little enhancement to the sweet berries. This recipe also uses tapioca starch (tapioca flour) to thicken the filling. I like the mild, slightly-sweet flavor of tapioca better than cornstarch, which has a more “starchy” taste, but you could always substitute it in a pinch. I’ve never been a pro at making pie crust (far from it, in fact), but this crust was surprisingly easy to work with. It’s an all-butter crust (yay for flavor!), and as long as you make sure that your ingredients are extremely cold and you’re careful not to add more water than necessary, you’ll end up with tender, flaky crust. I used to take the shortcut of buying a pre-made Pillsbury pie crust, but homemade is so much better. If you’re willing to brave making your own crust, I promise the end result will be worth the time and effort!

So…it just occurred to me that I’ve suggested that this recipe is unattainable to anyone who doesn’t happen to have blackberries growing out their back door. You know, since wild berries are so superior. While this is true, I hate to alienate all of you poor wild blackberry-less souls, so I’ll let you know that you could make this pie with store-bought blackberries. Fresh or frozen. I can’t say your pie will be the same, but it will probably still taste pretty good. It might even taste really good. You could also use any type of berry you like (blueberries, raspberries, loganberries, etc.) and I’m guessing you’d still end up with a darn delicious pie. So go ahead! I’ll shut up about the superiority of wild berries. But before I shut up, if you do have access to the wild ones, your pie will be even more amazing. Just keepin it honest! 😉

IMG_4078Wild Blackberry Pie

Makes one 9-inch double-crust pie

For the crust:

2 & 1/2 cups all-purpose flour

1 teaspoon salt

1 teaspoon sugar

1 cup (2 sticks) cold butter, cut into small cubes

1/3-1/2 cup ice water

For the filling:

6 cups blackberries

1/4 cup tapioca starch

1/2 cup sugar (add more to taste if your berries aren’t super sweet)

1 tablespoon fresh lemon juice

1 teaspoon fresh lemon zest

1 teaspoon vanilla extract

For assembling:

1 egg, beaten

Extra sugar, for sprinkling

Directions:

Place the flour, salt, and 1 tsp sugar into a food processor* and pulse once or twice to combine. Add in the chopped butter and process for about 10 seconds, or until the mixture resembles coarse crumbs. Pour the water through the food chute 1 tablespoon at a time, pulsing 2-3 times after each addition. As soon as the dough starts to stick together, pat it into a ball.

*If you don’t have a food processor, simply whisk together the dry ingredients and then cut in the butter using a pastry cutter or two forks. Sprinkle the water in 1 tablespoon at a time, tossing with a fork after each addition. When the dough sticks together, pat it into a ball.

Divide the dough ball in half and flatten each half into a thick disc. Wrap in plastic wrap and chill for at least 1 hour.

When ready to make the pie, preheat the oven to 425 degrees F. On a floured surface, roll out one of the pie dough discs into an 11-inch circle, then carefully transfer to a 9-inch pie plate. Gently press the crust into the pan and refrigerate while you prepare the filling.

Place the blackberries in a large bowl and sprinkle with the tapioca starch, sugar, lemon juice, lemon zest, and vanilla. Gently fold or toss the mixture until the berries are coated. Let the berries macerate (release their juices) while you roll out the second pie crust. If desired, cut the dough into 1/4-1/2″ strips for a lattice crust.

Take the pie plate out of the fridge and brush the bottom crust with beaten egg. Spoon in the berry filling and top with the second crust. If you’re making a lattice crust, weave the strips of dough onto the pie and smooth out the edges with your fingers. Cut off any excess pie dough around the sides, leaving enough overhang to crimp the edges. Brush the top crust with the remaining egg and sprinkle with sugar if desired.

Bake the pie for 15 minutes, then reduce the oven temperature to 375 degrees and bake for an additional 20-30 minutes. When the crust is golden-brown and the filling is bubbly, remove from the oven. If the edges are browning too fast, loosely cover with aluminum foil. Cool the pie for at least an hour before slicing.

(Crust and filling recipes adapted from The Baker Chic)

Quinoa Salad with Roasted Tomatoes, Chickpeas, and Tahini Vinaigrette

IMG_4035Surprising as it may seem, I do actually make food other than dessert. Behind all the butter and sugar, I happen to follow a fairly healthy diet. Of course I taste everything I make (my motto is everything in moderation), but most of it ends up in the stomachs of my friends and family members. Unless of course it’s something like these healthy Oatmeal-Raisin Energy Balls which I may or may not hoard in secret tupperware containers in the way way back of the fridge. Strange as it is, I actually get more excited about stuff like this quinoa dish than I do about chocolate chip cookies. Who am I?!IMG_4037

Now, before you lose all trust in me as a baker/blogger and toss me to the curb as a pitiful soul who chooses quinoa over cookies, you’ve gotta try this recipe! Then you’ll see what I’m talking about. With quinoa as its base, this salad is loaded with sweet balsamic-roasted cherry tomatoes, crispy roasted chickpeas, creamy avocado chunks, and nutritious baby spinach. Then it’s all tossed in a fabulous lemon-tahini vinaigrette–the recipe makes extra, so you can use it to dress other salads as well! My favorite way to serve it is slightly warm, but it’s also delicious at room temperature or straight out of the fridge. My family loves to eat this salad as a main dish for lunch or dinner, but you can also serve it as a side. Or you can do what I did and eat it straight out of the tupperware as a late-night snack!

If you’re looking for a fast, easy, meatlessgluten-free, and delicious dinner recipe, you have to try this! It’s got so many good things going on that I can’t pick a favorite…the juicy, almost caramelized tomatoes? The hidden pieces of smooth avocado? The slightly-nutty, slightly-sweet lemony dressing? Call me crazy to choose leftover quinoa salad as dessert instead of a cookie, but I just couldn’t get enough! The cookies can wait.IMG_4047

Quinoa Salad with Roasted Tomatoes, Chickpeas, and Tahini Vinaigrette.

Makes 6-8 servings

For the salad:

1 & 1/2 cups quinoa (uncooked)

1 pint (16 oz) cherry tomatoes

1 15-oz can chickpeas, drained and rinsed

1 tablespoon olive oil

1 tablespoon balsamic vinegar

Salt & pepper

1 avocado, diced

2 cups baby spinach

For the dressing:

1/4 cup tahini

3 tablespoons warm water

3 tablespoons olive oil

2 tablespoons red wine vinegar

1/4 cup lemon juice (from about 1 large lemon)

1 teaspoon honey

2 large garlic cloves, minced

Salt & pepper, to taste

Directions:

Cook quinoa according to package directions. While the quinoa is cooking, preheat the oven to 425 degrees F. When the quinoa is finished, fluff with a fork and allow to cool as you assemble the rest of the ingredients.

Wash and halve the cherry tomatoes and spread onto a lined baking sheet in a single layer. Add the chickpeas to the baking sheet and drizzle with 1 tablespoon olive oil and 1 tablespoon balsamic vinegar. Sprinkle with salt and pepper and roast for 25-30 minutes, stirring halfway through, until the tomatoes are blistered and the chickpeas are golden and slightly crisp. Cool slightly.

To make the dressing, whisk together all the ingredients in a medium-small bowl. Place the cooked quinoa into a large serving bowl and add in the roasted tomatoes, chickpeas, and baby spinach. Pour on as much dressing as you like (the recipe makes about 1 cup and I like to use about 2/3 cup). Stir gently to coat, then carefully fold in the diced avocado. Serve warm, chilled, or at room temperature.

(Recipe adapted from Tasty Kitchen)

Loaded Morning Glory Muffins

IMG_3396Another good name for these muffins would be Everything-but-the-Kitchen-Sink Muffins. I’m not quite sure who came up with that phrase to describe recipes that are full of add-ins, but I just like the sound of it. I suppose the phrase could have been everything-but-the-oven-door or everything-but-the-moldy-cheese, but someone chose “kitchen sink.” I can’t say it makes much sense, but people get what you’re talking about and it’s a lot more fun to say than “muffins filled with a whole bunch of stuff.” However, just in case someone out there read the title and got confused and pictured a batch of muffins made with dirty sink-water or something, I stuck with Loaded Morning Glory Muffins, which also has a nice ring to it. Very glorious-sounding, I’d say. And so concludes the end of my unnecessary thought process.

These muffins are based off of the infamous Morning Glory muffin…you know, those bakery muffins that are the size of your head and lumpy and brownish and full of peculiar objects? The the kind of muffin that your mom always chose and offered you a bite of, leading you to politely shriek “no, thank you!” while stuffing your face with your favorite blueberry-cream cheese muffin? You know those ones?

IMG_3393Needless to say, Morning Glory Muffins never much appealed to me throughout my childhood but now I can’t get enough! They’re packed full of carrots, zucchini, shredded coconut, dried cranberries, chopped apple, applesauce, flaxseed, and nuts (although I left those out in my version for no good reason other than not having any). I’ve seen some recipes that include diced pineapple as well, but I figured I had to stop stirring things in at some point. Not to mention that I didn’t have any pineapple, either.

Basically, my Morning Glory Muffins are a meal in themselves. The carrot, zucchini, apple, oil, and buttermilk come together to keep the muffins super soft and moist, and every bite is loaded with texture. They aren’t exactly health food, but compared to many muffins (ahem, blueberry-cream cheese muffins of my past) they’re not too shabby. I mean, as long as whole wheat flour, heart-healthy fats, fruit, and even vegetables are in there you can claim to be eating a healthy snack. I’ll totally back you up. 🙂IMG_3403

Loaded Morning Glory Muffins

Makes 18-20 standard-sized muffins

1 cup all-purpose flour

1 cup whole wheat flour

1 cup granulated sugar

1/4 cup brown sugar

2 teaspoons baking soda

1/2 teaspoon salt

2 teaspoons ground cinnamon

3 large eggs (I used 2 eggs + 1 “flax egg” made w/ 1 Tbs ground flaxseed mixed with 3 Tbs water and left to sit for 5 minutes)

1/3 cup vegetable oil

1/3 cup unsweetened applesauce

1/3 cup buttermilk

2 teaspoons vanilla extract

1 medium apple, finely diced

2 cups shredded carrots (I used a mix of carrots and zucchini)

1/2 cup shredded coconut

1/2 cup dried cranberries or raisins

1/2 cup chopped nuts (optional)

Directions:

Preheat oven to 350 degrees F. Grease or line muffin tins and set aside.

In a large bowl whisk together the flours, sugars, baking soda, salt, and cinnamon. In a smaller bowl whisk together the eggs (and flaxseed mixture, if using), oil, applesauce, buttermilk, and vanilla until smooth. Pour the wet ingredients into the dry and stir just until combined.

Fold in the chopped apple, shredded carrots/zucchini, coconut, cranberries, and nuts. Scoop the batter into the prepared muffin tins, filling 3/4 way. Bake for 18-22 minutes or until an inserted toothpick comes out clean.

Let the muffins cool in the tins for 10 minutes, then carefully move to a cooling rack. Store in an airtight container at room temperature.