Monster Cookies (Flourless!)

IMG_1239Let me introduce to you the ultimate cookie mash-up: oatmeal cookie meets peanut butter cookie meets chocolate chip cookie…meets M&M cookie! Phew. It’s no wonder they’re called monster cookies with all that goodness loaded in (although I’ve heard rumors that the name actually comes from a bakery that made mass–monster–quantities of these cookies). While my past few posts have featured recipes with some considerably strange ingredients, these monster cookies feature the exact opposite. Most of their ingredients are pretty typical for cookies–sugar, eggs, butter, vanilla, salt, baking soda–but there’s one common cookie ingredient missing…flour!IMG_1234

That’s right. The quick-cooking oats and three whole eggs hold these monster cookies together just fine, and they have the best chewy texture. I was worried that the lack of flour might result in flat pancake cookies, but they also stay tall and thick. In fact, you’d be wise to pat them down a little before baking, because their shape holds up really well in the oven. I made them extra-large because no way was I making regular-sized MONSTER cookies, and seriously, each cookie is like a meal in itself! The peanut butter and oats offer such a fantastic texture and flavor, and the chocolate chips and M&Ms bring in a nice dose of richness. IMG_1232

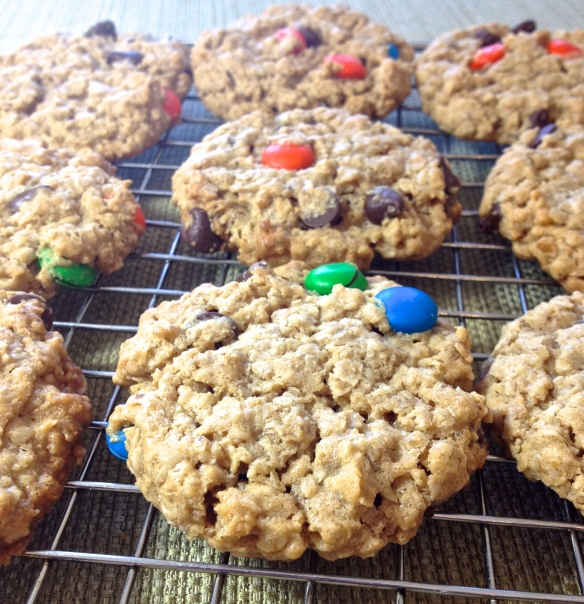
For those of you gluten-free folks out there, here is a cookie that you can eat too! Just make sure to use gluten-free oats, and you should be all set. My gluten-free mother, who has long since resigned herself to forgoing homemade cookies, was astounded to hear that she could actually eat these. At first she thought I was teasing her! Nothing like a pleasant surprise in the form of a monster cookie. 🙂 IMG_1236

Ditch the flour and make yourself a batch of these overloaded monster cookies. You’ll never have to decide between peanut butter, oatmeal, and chocolate chip cookies again!IMG_1241

Monster Cookies

Makes about 3 dozen cookies

1 & 1/4 cup light brown sugar, packed

1 cup granulated sugar

3 large eggs

1/2 cup (1 stick) unsalted butter, softened

1 & 1/2 cups creamy peanut butter

1 teaspoon vanilla extract

1/2 teaspoon salt

2 teaspoons baking soda

4 & 1/2 cups quick-cooking oats

1 cup chocolate chips

1 cup M&Ms

Directions:

Preheat oven to 350 degrees F. Line or grease two cookie sheets and set aside.

In a large bowl, beat together the sugars and eggs until smooth. Mix in the butter, peanut butter, vanilla, and salt until well-combined. Stir in the baking soda, oats, chocolate chips, and M&Ms.

Roll the dough into balls (mine were about 1.5 tablespoons each) and place 2 inches apart on prepared cookie sheets. Slightly flatten each ball with the back of a spoon or the palm of your hand.

Bake for 10-12 minutes, or until the tops are set and the edges are light golden-brown. Don’t overbake! Cool the cookies for 2 minutes on the cookie sheets before transferring to a wire rack. Store in an airtight container at room temperature.

*Note: the dough balls can also be frozen and baked for 12-14 minutes (without thawing!) as desired.IMG_1244

Recipe adapted from Mel’s Kitchen Cafe

Healthy No-Bake Cookies

no-bakecookiesMy first batch of no-bake cookies can only be described as a disaster. I was in middle school at the time, and my friend and I were lounging around her house trying to decide what to do when her mom suggested no-bake cookies. I had never heard of them but was all too willing to try them out. The recipe called for butter, peanut butter, sugar, vanilla, oatmeal, and milk…I’m pretty sure that was it. Total health food! Luckily our pre-teen metabolisms could handle it, and we got right to work.

The standard recipe for no-bake cookies is pretty simple: melt the peanut butter, butter, and sugar; stir in everything else; drop the mixture onto cookie sheets. Let it set up, and you’re done. Fool-proof, right? Not so much…

My friend and I divided the task of measuring ingredients, and peanut butter fell onto my side. “I think there’s a jar of Skippy in the cupboard,” she said, and I obligingly skipped over to the cabinet. Sure enough there were two jars of peanut butter, one farther back than the other. I chose the emptier one in the back, if only to help her family use it up. As soon as I screwed open the jar I noticed a funny smell, but I didn’t say anything. My family always bought natural peanut butter that you had to stir, so I figured Skippy just smelled a little different. That was my first mistake.nobakecookies2

I scooped out the appropriate amount of peanut butter and dumped it into the saucepan along with the other ingredients. Five minutes later we were forming the mixture into little balls and placing them onto a wax-paper-lined cookie sheet. I’ve always been a “taster” when it comes to baking (my justification is that any incorporated germs are killed by the heat of the oven…and let’s just pretend the no-bake thing doesn’t exist) so I definitely snuck a pinch or two of the dough. It tasted…bad. Not a little bad, a lot bad. It’s a taste that I now know can be described as rancid nuts (shocker, right)?! Seeing my expression my friend tried it too, and made the same disgusted face as I had.

“Why didn’t you tell me the peanut butter smelled funny?” she asked. “We could have used the other kind.”

“Well, uh…” I started to reply. “I don’t know.” Satisfying answer for sure.

We threw out the entire batch and sadly resumed our lounging around. But fear not, because we definitely made a successful batch at another point in time! I think I probably put her in charge of the peanut butter…

And now we have reached the end of the road where I stop talking about my crazy life and cut to the chase. THESE no-bake cookies are just about as easy as the originals (if not easier) but they have the benefit of actually being good for you. Yeah, there’s chocolate, but it really doesn’t count since the rest of the ingredients are so healthy. That’s how it works–you heard it from me! They’re pretty darn good too, considering the lack of butter and sugar. They definitely aren’t as sweet as “regular” cookies, so if you aren’t used to that you can definitely add in a couple tablespoons of sugar or additional honey. Also, the riper your banana is, the sweeter the cookies will be. Bananas FTW! Always.

But yeah. These easy-healthy-delicious cookies are winners, at least in my opinion. We’ve got chocolate, peanut butter, honey, AND banana all in the same place, which can only lead to good things. Just make sure your peanut butter’s not rancid, okay? Great. 🙂

nobakecookies3Healthy No-Bake Cookies

1/2 cup creamy peanut butter

1 small ripe banana, mashed (1/3 cup)

1/3 cup honey

1/4 cup cocoa powder

1/4 cup milk (any kind)

3 cups quick-cooking oats

1/2 teaspoon cinnamon (optional)

Pinch of salt

1/3 cup mini chocolate chips

Directions:

Place the peanut butter and mashed banana in a medium saucepan over low heat. Stir until melted and smooth, then remove from heat. Stir in the honey, cocoa powder, milk, oats, cinnamon, and salt until combined. Stir in the chocolate chips.

Scoop the dough into rounded tablespoons and place on a lined cookie sheet. Press each mound of dough down slightly until the desired shape is reached. Chill for at least 2 hours before enjoying. Store covered in the refrigerator for up to 10 days.

(Recipe adapted from Sally’s Baking Addiction)

No-Bake Chocolate Peanut Butter Bites

IMG_2440I’m sitting here in shorts and a tank top, the thermometer reads 78.4 degrees, and I have an awesome tan line on my neck/shoulder from wearing a side ponytail all day while out in the sun (<—fail). So basically, for all us Pacific Northwest wussies, it’s a sweltering summer day. Sorry if you happen to live in Phoenix or something and would give up an arm and a leg to have a 78.4-degree day right about now, but up here in the land of clouds and drizzle we consider this a hot day indeed. Or at least I do. But I still love it!

IMG_2453

Even though I really do enjoy the warmer weather, it certainly doesn’t make me too excited to turn on the oven for a baking project in the middle of the day. Instead I turn toward no-bake desserts like these awesome little energy bites. The good news about these treats is that they aren’t full of fat and sugar to weigh you down. They’re made with a super short list of fresh, healthy ingredients and are gluten-free, vegan, and contain only natural sugars. (If you’re making them gluten-free, be sure to use gf oats!) You do need a food processor for these, but if you don’t have one don’t worry. Just try these other wonderful energy balls instead!IMG_2451

My family went nuts over these cookie-dough-like bites. They’re perfect as an after-dinner treat or as a little snack to pick you up from an afternoon slump. You could even grab a few for breakfast! I love how in a matter of minutes I can be eating these delicious, nutritious little balls in a house that hasn’t turned into a sauna from a 350-degree oven. It’s almost like eating chunks of oatmeal-chocolate-peanut butter cookie dough, but the ingredients are actually good for you…summer eating at its finest!IMG_2444

No-Bake Chocolate Peanut Butter Bites

Makes about 24 small bites

1/2 cup peanut butter

1/2 cup quick-cook oats

2 tablespoons unsweetened cocoa powder

1/2 teaspoon vanilla extract

1/2 cup dates (about 12 dates, or 86 grams)

2 tablespoons water*

Shredded coconut, mini chocolate chips, or extra cocoa powder for rolling (optional)

Directions:

In a food processor, combine all ingredients except for the water. Process until the mixture clumps together. Add in the water and pulse until incorporated. Pinch off pieces of the mixture and form into small balls (I ended up with about 2 dozen). Roll in shredded coconut, chocolate chips, or cocoa powder if desired. Store the bites in the refrigerator.

*To make the bites a little sweeter, substitute 1 tablespoon agave nectar, honey, or maple syrup for 1 tablespoon of the water

(Recipe adapted from Chocolate Covered Katie)

Oatmeal-Chocolate Chunk Cookies

IMG_4737

Welcome to the workings of my over-analytical brain…read on if you have the inclination, or feel free to skip down to the recipe. I won’t blame you, ’cause cookies are always the best part! 🙂

One of the biggest mistakes that I think people make after graduating high school is believing that what they decide to do next will solely determine the rest of their lives. While it’s certainly true–and certainly a bit scary–that every new choice will AFFECT their adult lives, I have to keep reminding myself that things change. Transfers can be made; majors can be changed; job interviews may be botched and apartment deals may fall through. It’s way too constricting to think in terms of finding that ONE perfect college, major, job, etc., because you never know what new passions, opportunities, or disappointments may come along.

IMG_4734

This past year has taught me to take life one step at a time. Contrary to how it sometimes feels near the end of high school/beginning of college, there’s no “right choice” as to what to do next. I’m more than happy with the school I chose, and although I’m pretty set on minoring in Spanish I still haven’t decided on a major. Psychology and creative writing are the top contenders, both of which I have a natural interest in and see myself pursuing as careers in some form or another. The problem was that for a long time, I kept thinking in terms of elimination, as though I had to keep crossing off less-important interests in my life until I narrowed it down to the one, the strongest of my interests that would then become my career.

As I thought about it though, I decided that that was ridiculous. My dad, an anthropology major/geography minor, has been a construction worker, park ranger, and teacher during different times in his life, and almost every adult I can think of has followed more than that one perfect path. It’s not as though I can make a huge mistake by majoring in creative writing, as if I would have to somehow give up my interest in psychology or any hope of having a career in which it’s involved. Yes, my chosen degree may change my range of job opportunities or qualifications after college/grad school, but I have to believe that things tend to work out in the end. Sometimes I have to tell my cut-throat, rational self to shut up for a minute and let my optimist side take the lead!

Basically, my philosophy right now is to experiment, find out what I love and what I don’t love as much as I thought I did, and get rid of the mindset that I can’t have more than one  passion. Aaaand, that passion doesn’t necessarily have to take form as a job! Maybe someday it will be harder to simply “change my mind,” but for now that’s kind of the point. One of my favorite quotes has always been “the biggest mistake you can make in life is to live in fear of making one!”

IMG_4733


You know, all of this applies to more than just school and education and careers…it also applies to cookies. I see recipes all the time claiming to be the best this, the perfect that, and sometimes I fall into the trap of trying to choose. Somewhere out there must be the perfect chocolate chip cookie recipe, the perfect flawless pie crust, the best blackberry pie. But maybe, just maybe, there can be more than one “perfect!” Sometimes I’m in the mood for the super-soft chocolate chip pudding cookie, but other times I want the more traditional thick and chewy ccc’s. I often fall into the habit of making my favorites over and over again (which, by the way I do not see as a problem!), buuuut sometimes it’s fun to try something else, something that might be just as good in its own different way.

IMG_4738

I’ve probably tried about a dozen different oatmeal cookie recipes over the years, ranging from thin/crispy/chewy to thick/soft/chunky. Sometimes I’m more creative with dried cranberries, white chocolate chips, coconut, macadamia nuts, etc., and sometimes I leave the cookies plain and pure. For some recipes I add in raisins and a dash of cinnamon, while other times I go for chocolate chips. Often I add both! Is there one right way to make oatmeal cookies? I say no!

So, although I already have these and these and these and these and these aaaand these on the blog, I’m adding another oatmeal cookie recipe. Because it’s always good to have options! And who can say no to Oatmeal-Chocolate Chunk Cookies? These are in the camp of crispy on the edges, chewy in the middle, and extra-oaty. Definitely one of the best cookies around 🙂

IMG_4741

Oatmeal-Chocolate Chunk Cookies

Yield: about 3 dozen cookies

1 cup butter, softened

1 cup brown sugar, packed

3/4 cup granulated sugar

2 eggs

2 teaspoons vanilla extract

1 & 1/2 cups all-purpose flour

1/2 teaspoon baking powder

1/2 teaspoon salt

3 cups old-fashioned oats

1 & 1/2 cups chocolate chunks

1/2 cup chopped walnuts

Directions:

Preheat oven to 350 degrees F.* Line two baking sheets with parchment paper or a silicone mat and set aside.

In a large bowl, cream together the butter and sugars until light and fluffy. Beat in the eggs one at a time, followed by the vanilla.

In a smaller bowl, whisk together the flour, baking powder, and salt. Stir the flour mixture into the wet ingredients just until combined. Stir in the oats, chocolate chunks, and walnuts. Form the dough into balls about 1.5 tablespoons each. *To prevent spreading, you may choose to chill the unbaked cookies for 30-60 minutes. In this case, wait to preheat the oven.

When ready to bake, place the cookie dough balls 2 inches apart onto prepared cookie sheets. Bake for 12-14 minutes, or until edges are golden-brown and centers are set. Be careful not to over-bake if you prefer chewy rather than crispy cookies! Let the cookies cool on the sheets for 3 minutes, then transfer to a wire rack to cool completely. Store cookies in an airtight container at room temperature for up to 5 days.

(Recipe adapted from Brown Eyed Baker, originally from Baking Illustrated)


Oatmeal-Raisin Energy Balls (No-Bake!)

IMG_6974I’ve only been home from college for two weeks, but I’m already in full-on summer mode. The weather was particularly cooperative when I first got home, with sunny days and temperatures in the 70s, and although our island has now succumbed to its more usual May weather (overcast skies and temperatures in the low 60s) I’m still in a summery mood. I’ve started back up with my summer jobs, taken long runs in the (sometimes) sun, bought tons of fresh summer fruit that finally doesn’t cost an arm and a leg, and carried out a considerably admirable attempt at purging my closet of STUFF. Since coming home I’ve been somewhat overwhelmed at the amount of STUFF cluttering up our entire house, and I’m trying to do a bit of summer cleaning. I can never decide which is stronger: the hatred I have of the actual cleaning, or the wonderful freeing feeling of a de-cluttered house. It’s an ongoing dilemma.

IMG_6961

One of my favorite parts of summer is more time for cooking and baking, and it’s been so nice to be back in a real kitchen. Ice cream sandwiches, Greek-themed dinners, chickpea curry, lemon-poppy seed bars and energy bites are just a few of the things that have emerged from my kitchen in the past two weeks. Today I’m sharing a recipe for some of the quickest, easiest, and healthiest little treats you can find. These Oatmeal-Raisin Energy Bites are gluten-free (if you use gf oats), dairy-free, low-sugar, and packed full of fiber, protein, and healthy fats. They’re made in one bowl with one spoon, and you don’t even have to turn on your oven! Sounds pretty fool-proof to me.

IMG_6994

The other morning I woke up to an email from my mom (yes, we live in the same house and see each other multiple times a day yet she still gets a kick out of emailing me), saying that the little energy balls were so, so delicious and she hopes I’ll make them “again and again.” I just had to chuckle. Especially considering the fact that she was in the next room when I read it. I won’t even pretend to understand her logic, but there’s no doubt about it that these energy bites really do taste amazing! They’re full of flavor, are sweet but not too sweet, and have a wonderful chewy texture from the softened oats. I think the balls are quite reminiscent of oatmeal-peanut butter cookie dough, but they’re so much better for you!

This recipe is also super adaptable. Use whatever nut butter you like in place of the peanut butter, sub in maple syrup or agave nectar for the honey, use cocoa powder or oat flour instead of ground flaxseed, and use your favorite add-ins if you don’t like raisins. Chocolate chips, dried cranberries, or nuts would all be delicious. I promised my mom (via email, just to humor her) that I would be more than happy to make them again and again! I can’t wait to play around with other combos, and these simple balls are the perfect solution to an 8pm snack craving. Hope you enjoy these as much as we do!

IMG_6999

No-Bake Oatmeal-Raisin Energy Balls

Yield: about 20-24 balls

1 cup old-fashioned oats

1/2 cup creamy peanut butter

1/2 cup ground flaxseed

3/4 cup unsweetened coconut flakes

1/3 cup honey

1 teaspoon vanilla

1 teaspoon ground cinnamon

1/2 cup raisins

Directions:

Combine all ingredients in a large bowl and stir well. If the mixture is too dry, add in an extra tablespoon or so of honey. If it’s too wet, add in a bit more oats.

Chill for 30 minutes, then form the dough into tablespoon-sized balls. The energy bites can be stored in an airtight container in the refrigerator for up to 1 week.

(Recipe adapted from Smashed Peas and Carrots)


Blueberry-Almond Crisp

IMG_6478One of my favorite things about summer is the fruit. As fresh strawberries, raspberries, blueberries, peaches, plums, mangoes, cherries, and more start appearing in the produce section I feel much like a kid in a candy store. Since on our tiny island it’s ridiculously expensive (and often impossible) to attain summery fruits throughout most of the year, I always look forward to loading up on all my favorite fruits throughout the spring and summer months.

IMG_6483

Summertime’s surplus of fresh fruit also means some extra-tasty desserts. As convenient as frozen fruit is, there’s nothing like a blackberry pie made with berries picked from the wild tangle of bushes down the lane or a rustic galette filled with sweet, fresh cherries rather than the usual sticky red canned ones. Pies, cobblers, crumbles, etc. are some of my favorite go-to desserts throughout the summer because they allow for sweet, juicy fruits to take center stage.

IMG_6491

This Blueberry-Almond Crisp is the perfect treat for a warm summer evening: plump, sweet blueberries are tucked underneath an oatmeal-almond crumble topping and baked until the top is crisp and golden and the berries are thick and bubbly. I love the combination of blueberries and almond, and this crumb topping packs in just the right amount of almond crunch and flavor to contrast the sweet, juicy blueberries. A warm bowl of Blueberry-Almond Crisp with a scoop of vanilla ice cream tastes like the epitome of summer, at least in my book.

IMG_6488

This recipe has become a summertime favorite in my family. Go pick up a container of fresh blueberries and try out this wonderful crisp for yourself! You don’t want to miss out on this one.

IMG_6494

Blueberry-Almond Crisp

For the fruit filling:

4 cups fresh blueberries (or unthawed frozen blueberries)

1 tablespoon fresh lemon juice

1 teaspoon fresh lemon zest

1/4 teaspoon vanilla extract

1/4 teaspoon almond extract (optional)

1/2 cup granulated sugar

1/4 cup all-purpose flour

For the crumb topping:

1/2 cup all-purpose flour

1/4 cup old-fashioned oats

1/4 cup sliced almonds

1/3 cup light brown sugar, packed

1/4 cup granulated sugar

1/2 teaspoon salt

1/2 teaspoon ground cinnamon

1/4 cup (4 tablespoons) cold butter, cubed

2 tablespoons almond paste

Directions:

Preheat oven to 350 degrees F. Lightly grease an 8″x8″ baking pan; set aside.

Place the blueberries in a large bowl. Add in the lemon juice, lemon zest, vanilla, sugar, and flour. Gently fold the mixture until the blueberries are well-coated. Let the berries sit and macerate while you make the topping.

For the topping, whisk together the flour, oats, almonds, sugars, salt, and cinnamon in a medium-sized bowl. Using two forks or your fingers, cut in the cold butter and almond paste until the mixture holds together into large crumbs.

Spoon the berry mixture into the bottom of the prepared baking dish. Top with the crumb mixture and bake for 40-45 minutes or until the topping is golden-brown and the filling is bubbly. Let the crisp cool slightly. Serve warm or at room temperature with ice cream or whipped cream, if desired.

(Recipe heavily adapted from Two Peas and Their Pod)

Chocolate-Peanut Butter-Oatmeal Cookies

IMG_3922Before anything else, I feel as though I must warn you. This warning is not to be taken lightly and should be adhered to by all costs: Do not, I repeat, DO NOT taste this cookie dough. Seriously. Because if you start, you most likely will not be able to stop. One tiny taste will lead to another, and another, and before you know it you will have an empty bowl and a horrible stomachache and no delicious cookies to share with your friends and family or hoard for yourself or sneak to your dog and your life will be ruined and you’ll blame me and I can’t have that happening, now can I? So please, unless you’re an absolute master of self-restraint, keep your fingers out of the bowl. It’s a slippery slope, guys, a slippery slope indeed.

IMG_3924

I first tried these cookies about seven years ago, when our good friend Emily delivered them as a thank-you. My whole family went nuts over them and immediately requested the recipe. I remember my dad describing the cookies as “a meal in themselves,” and they really are. A tall glass of milk is definitely necessary when eating one of these! Cocoa powder, peanut butter, oats, chocolate chips, peanut butter chips…these cookies are absolutely ridiculous in the best way possible. I’m kicking myself for having let the recipe get away from me for so many years. Taking a bite of one of these big, warm, chewy cookies fresh out of the oven tempted me to declare them my “favorite cookie ever.” This is a label I do not use lightly, but these cookies just might be worthy. They really are incredible…not overly sweet, full of so many great flavor/texture combos, and ultra thick and chewy.

IMG_3914

Get ready to experience what may very well become your new favorite cookie. These aren’t for the faint-hearted…with dough loaded up with cocoa, peanut butter, oats, semisweet chocolate AND peanut butter chips, these are definitely on the rich side! The  oats, darker chocolate, and salty peanut butter help keep things from getting too sweet (if there is such a thing!) and they’ve got a wonderfully hearty texture thanks to the oats. And the smell of these cooking? Heavenly. Just remember what I said about sampling the dough, because one bite and it’s game over. Patience is virtue, and the end result is so very worth it. Of course, once the dough balls are formed and safely inside the oven, I can’t say you shouldn’t lick the bowl clean. Your choice, not mine :).

IMG_3921_2

Baked or not, these cookies are seriously awesome. So much goodness going on. Make them, eat them, savor them. I’ll stop raving and just give you the recipe now…you know you want it!

IMG_3927

Chocolate-Peanut Butter-Oatmeal Cookies

Yield: about 36 cookies

1 cup unsalted butter, at room temperature

1 cup granulated sugar

1 cup light brown sugar, packed

3/4 cup creamy peanut butter

2 large eggs

1 tsp vanilla extract

2 cups all-purpose flour

1/4 cup unsweetened cocoa powder

2 tsp baking powder

1/2 tsp salt

1 cup semisweet chocolate chips

1 cup peanut butter chips (or swap for more chocolate chips)

1 & 1/2 cups quick-cooking oats (not instant!)

Directions:

Preheat oven to 350 degrees F. Line or grease baking sheets and set them aside.

In a large bowl, using an electric mixer, beat together the butter, sugars, and peanut butter until smooth and creamy. Beat in the eggs one at a time followed by the vanilla, scraping down the bowl as needed.

In a smaller bowl, whisk together the flour, cocoa powder, baking powder, and salt. Gradually add the dry ingredients into the butter/sugar mixture just until combined. Stir in the chocolate chips, peanut butter chips, and oats.

Form dough into balls that are about 2 tablespoons large and place onto prepared cookie sheets 3 inches apart. Slightly flatten each ball to make them about 3/4-inch thick.

Bake for 12-14 minutes or until edges are set and tops are no longer shiny. Be careful not to over-bake! Let cookies cool for 5 minutes on baking sheets before removing to a wire cooling rack.

(Recipe from our family friend Emily)

Oatmeal Lemon Creme Bars

IMG_3877Years ago, before I was a bona fide baker (although whether I am even now depends on your definition 🙂 ), I often used baking mixes. Felt like it was a perfect morning for muffin-making? I would pull out a trusty Krusteaz box. Had a hankering for brownies? Pillsbury it was (the type with the chocolate syrup pouch, of course.) Cupcakes needed for a bake sale? Hello, Betty Crocker. The fall-back line seems to be that pre-packaged mixes are faster and easier than from-scratch recipes, but in all honesty you really don’t save that much time using mixes. Unless the project at hand is something like homemade cinnamon rolls or a particularly tricky candy, it’s almost as quick to mix up a batch of homemade brownies or cookies than to succumb to a chemical-laden, artificially-flavored box mix. In my humble opinion, baking from scratch is often cheaper, yields a better-textured and better-tasting product, and allows for much more variety in your baking. Well there’s my two cents! Now we can get down to business :).

I originally found this recipe for Oatmeal Lemon Creme bars off the Betty Crocker website. The combination of crumbly oatmeal cookie and creamy lemon filling sounded utterly amazing, and I just knew I had to try them. However, the recipe called for a pouch of Betty Crocker oatmeal cookie mix, an ingredient which: a) would force me to eat my words about the evils of pre-packaged mixes and b) is unavailable at my two tiny grocery stores. They’ve got chocolate chip cookie mix, peanut butter cookie mix, sugar cookie mix, and molasses cookie mix, but no oatmeal cookie mix. Go figure! Not that I actually looked, of course, because that would mean that I was actually considering buying a mix. Which would be ludicrous, right? Um, right.

Lucky for me, a quick google of “Oatmeal Lemon Creme Bars” brought up a whole list of sites that had adapted the same Betty Crocker recipe, many of which included a from-scratch option for the cookie dough. Yay, internet! Happy that I could still try those glorious Oatmeal Lemon Creme Bars, I whipped them up in no time at all.

IMG_3876

For such a simple recipe, these sure take the cake (or should I say bar)! Their slightly crumbly, slightly crisp, not-too-sweet oatmeal top and bottom sandwich a smooth, creamy, lemony filling for a killer flavor (and texture) combination. The lemon flavor is definitely present but isn’t overpowering thanks to the thick, cheesecake-like filling and oatmeal cookie layers. Soooo good. I have to say the bars are best after being chilled, so that the filling can firm up a little and the crust gets nice and chewy, but they are delicious at room temperature as well. You really can’t go wrong! These are a perfect low-maintenance yet stellar dessert to bring to potlucks, parties, meetings, etc. or to just enjoy at home. This won’t be the last time these wonderful little bars appear at my house!

IMG_3874

Oatmeal Lemon Creme Bars

For the oatmeal cookie dough:

1 & 1/3 cups all-purpose flour

1 tsp baking powder

1/2 tsp salt

1 cup old-fashioned oats

1/2 cup (1 stick) butter, softened but still cool

1 cup light brown sugar, lightly packed

For the lemon creme filling:

1 14-oz can sweetened condensed milk

1 Tbs lemon zest (from about 1 large lemon)

1/4 cup fresh lemon juice (from about 1 large lemon)

Directions:

Preheat oven to 350 degrees F. Grease an 8″x8″ glass baking pan; set aside.

In a large bowl, cream together the butter and brown sugar until light and fluffy. Whisk together the flour, baking powder, salt, and oats in a smaller bowl. Stir the dry ingredients into the butter/sugar mixture until combined. Press a little more than half of the dough into the bottom of the prepared pan and bake for 15 minutes.

While the bottom layer is baking, stir together the sweetened condensed milk, lemon zest, and lemon juice in a small bowl until smooth. When the crust is finished baking, pour the lemon creme over the hot crust, smoothing the top with a spatula. Crumble the remaining cookie dough over the lemon creme and bake for an additional 25 minutes, or until crust is light golden.

Let the bars cool completely before slicing into squares. Store in an airtight container in the refrigerator.

(Recipe inspired by Betty Crocker, cookie dough recipe from Sally’s Baking Addiction)

Skinny Chocolate Coconut Muffins

IMG_3180When I was little, I had a bit of a sweet tooth. Actually, it was more like a saber-tooth-tiger-sized sweet tooth, meaning that if I could I would inhale every piece of sugar that came my way. Lucky for me I had the metabolism of a hummingbird and two parents whose idea of treats was honey sticks, organic rice pudding, and homemade fruit juice popsicles. Maybe it was because we only had junk food on special occasions (Jell-O when we were sick, Starbursts when we went to the movies, Dove Bars when my grandparents visited) that I was unstoppable when supplied with sugary treats.

Whenever we stayed at hotels, I always took full advantage of the complimentary breakfast, piling my plate high with danishes, cinnamon rolls, muffins, and whatever other sugary carbs were available in the little plastic display cases. It was another one of those special occasions I so looked forward to. My parents used to worry about what would happen to me once I grew up and moved out of the house. I think they pictured me going walking into the grocery store and having free reign to buy whatever I felt like, and that was a terrifying image at the time.

They needn’t have worried, because now I’m much more sensible. I sample what I bake and eat some candy, but for the most part I stay away from overly-processed, corn-syrup-ridden junk. Moderation is my motto, and my parents no longer fear that their only daughter will become a walking block of sugar–I do most of our grocery shopping, too, and I can promise it’s all quite healthy…for the most part ;).

However, for those of you that still have insatiable sweet tooths (sweet teeth just sounded weird), I have a chocolatey treat that I think you’ll love…and your waistline will love too! These are the type of muffin that you don’t have to feel guilty about piling onto your breakfast plate…they’re gluten-free, low-fat, and low-sugar, but still super moist, rich, and delicious. My mom, who’s been gluten-free for a few years now and hasn’t had a “cupcake,” as she called these, in forever, proclaimed that these were “the BEST cupcakes” she thinks she’s ever had. Of course, given the amount of time she’s spent away from gluten I doubted she could even remember what a real cupcake tastes like. When I tasted one, though, I ate my words–no pun intended! The texture is really more like a cupcake than a muffin, with a fine crumb and a mega-chocolate flavor. The oats add a little chewiness, which I love, and the coconut sugar and sprinkling of coconut flakes give just a hint of tropical flavor. If someone had told me when I was six that I could eat a chocolate cupcake for breakfast, I would have practically fainted with glee.

It’s true that you’re totally justified to eat these for breakfast. They’re practically health food. Seriously. Go for it. YOLO.

IMG_3187


Skinny Chocolate Coconut Muffins

Yield: about 18 standard-size muffins

1 cup hot water*

3 large egg whites

1/2 cup unsweetened applesauce

1/2 cup plain Greek yogurt

1 tsp vanilla extract

1 3/4 cup oats

1 cup coconut sugar (or granulated sugar)

3/4 cup unsweetened cocoa powder

1 1/2 tsp baking powder

1 1/2 tsp baking soda

1/2 tsp cream of tartar

1/4 tsp salt

1/2 cup dark chocolate chips

1/4 cup unsweetened shredded coconut

*Alternately, you could omit the cream of tartar and use 1 cup of buttermilk

Directions:

Preheat oven to 350 degrees F. Line 18 muffin tins with paper liners and set aside.

In a large bowl, whisk together the buttermilk, egg whites, applesauce, yogurt, and vanilla until smooth. Stir in the oats, coconut sugar, cocoa powder, baking powder, baking soda, cream of tartar, and salt. When incorporated, stir in the chocolate chips.

Scoop the batter into prepared muffin tins, filling about 3/4 of the way. Sprinkle batter with shredded coconut and bake for 18-22 minutes or until an inserted toothpick comes out with just a few moist crumbs. Cool and enjoy!

(Recipe adapted from Six Sisters’ Stuff)

Pumpkin Granola Bars

November 1st.  That dreaded day after Halloween when everyone is either groggy and grumpy from lack of sleep the night before or completely wired from eating an obscene amount of candy.  Having two parents as teachers, November 1st is a somewhat dirty word in our house.  Or, uh, two words that is.  I blame my overtired, post-Halloween brain…hey, case in point!

These granola bars are a perfect pick-me-up for days like today.  Full of oats, pumpkin, fall spices, maple syrup, cinnamon chips and dried cranberries, there’s nothing not to like. Not to mention that they are waaay cheaper than buying a box of granola bars that are probably full of preservatives and ingredients that I can’t pronounce, unless you want to the buy the even more expensive healthy type.  Sorry, store-bought granola bars.  I’ve got nothing against you, I promise, but you’ve got nothing on these homemade guys!  Sorry. 

Halloween may be over, but autumn is still here, so savor these last few weeks of fall flavors in the form of these granola bars!  Adapt them as you wish, but I have to admit that this pumpkin/cinnamon chip/cranberry combo is prettttty darn good.  Enjoy, friends! 🙂

Pumpkin Granola Bars

3 1/4 cups old-fashioned oats

1 tsp ground cinnamon

1/2 tsp pumpkin pie spice

1/4 tsp ground nutmeg

1/2 tsp salt

3/4 cup light brown sugar, packed

1/2 cup pumpkin puree (not pie filling!)

1/4 cup unsweetened applesauce

1/4 cup pure maple syrup (or honey)

1 tsp vanilla extract

1/2 cup cinnamon chips (or chocolate chips)

1/2 cup dried cranberries (or nuts, raisins, etc.)

Directions:

Preheat oven to 350 degrees F.  Spray an 8″x8″ baking pan with cooking spray and set aside.

In a large bowl, whisk together the oats, cinnamon, pumpkin pie spice, nutmeg, and salt.  In a medium bowl, whisk together the brown sugar, pumpkin, applesauce, maple syrup and vanilla until smooth.  Using a rubber spatula, fold the wet ingredients into the oats until well-combined.  Stir in the cinnamon chips and cranberries.

Evenly press the mixture into the prepared pan.  Bake for 35-40 minutes or until golden-brown and firm.  Allow to cool completely before cutting into bars.  Bars can be stored for several days in an airtight container at room temperature.

(Recipe adapted from Brown Eyed Baker)