Chocolate Chip Cookie Dough Billionaire Bars

IMG_4316

Today I have a very special post for you. (And no, I’m not talking about fact that these bars contain shortbread, caramel, cookie dough, and chocolate, although that is pretty special.) I’m pleased to report that this is….drumroll please….the 100th post of Emma’s Baking Addiction! Funny enough, it falls almost exactly on my blog’s one-year birthday. Two landmark events for a baking blog equals two excuses to bake two fabulous, over-the-top celebratory treats. First up are these Chocolate Chip Cookie Dough Billionaire Bars, a worthy candidate for my 100th blog post.

When I first started thinking about what to make for the big 1-0-0, Millionaire Bars came to mind. You know, the shortbread-caramel-chocolate layered bars that are very similar to a homemade Twix? That are apparently so good that they make you feel like a million bucks? Or are worth a million dollars? Make you gain a million ounces? Don’t ask me how they were named. I guess it was something about the fact that “one hundred” and “one million” are both numbers that made me think of baking Millionaire Bars to celebrate the 100th post. An obvious connection, right? Right? Maybe-possibly-not-so-much? It made better sense in my head.

Anyway, upon looking for a great Millionaire Bar recipe to make as my 100th post (which, as we’ve established, makes total sense) I found the recipe for these babies. Not just Millionaire Bars, these are Billionaire Bars. Which means they’ve gotta be good. Not only do they have the buttery shortbread, gooey caramel, and decadent chocolate of their lesser-valued cousin, these bars have the brilliant addition of a chocolate chip cookie dough layer. An eggless chocolate chip cookie dough layer, that is, which means it can be eaten raw with absolutely zero worries or frets. Be still, my cookie-dough-loving heart!

IMG_4328

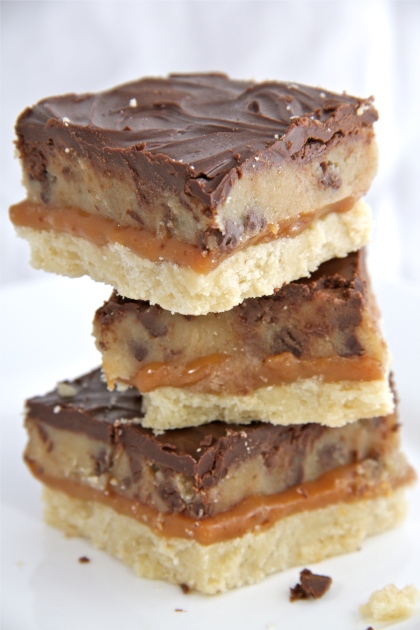
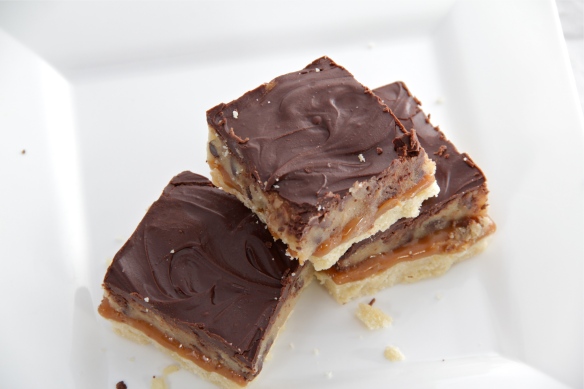
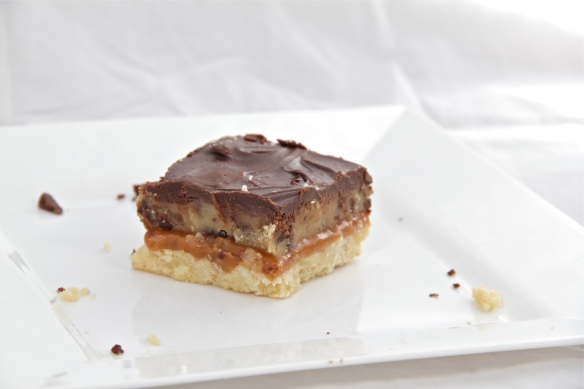
Let’s take a look at what we have here: a bottom layer of crumbly, melt-in-your mouth shortbread; a second layer of sweet, sticky caramel (not from scratch, for those of you who are terrified of caramel-making, like me this one person I know); a third layer of raw chocolate chip cookie dough that will make the bowl-licking-dough-sneaking little kid in all of us cry tears of joy; and a final layer of rich semisweet chocolate. Yes, there’s a lot of patience involved as each layer bakes or chills, and yes, there’s the possibility of a major sugar rush afterward, but it’s all totally worth it when you sink your teeth into one of these. They’re better than a billion dollars!! (Just don’t hold me to that if I’m ever actually given the choice, kay?)

IMG_4323

I hate to say it, but Millionaire Bars have lost a little bit of their luster to me now that I’ve made these Chocolate Chip Cookie Dough Billionaire Bars. It’s not that I wouldn’t satisfied with the original bar, it’s just…a layer of eat-able chocolate chip cookie dough sandwiched between chocolate and caramel? With a shortbread crust, for goodness sake?! Billionaire status indeed.

Happy 100th post, little blog!

IMG_4330

Chocolate Chip Cookie Dough Billionaire Bars

Yield: 16 bars

For the shortbread crust:

1/3 cup unsalted butter, at room temperature

1/3 cup granulated sugar

1/2 teaspoon vanilla extract

1/4 teaspoon salt

3/4 cup all-purpose flour

For the caramel:

7 ounces soft caramels (about 25 candies)

2 tablespoons heavy cream

For the cookie dough:

1/2 cup (1 stick) unsalted butter, at room temperature

1/2 cup light brown sugar, packed

1/4 cup granulated sugar

1/2 teaspoon vanilla extract

2 tablespoons heavy cream

1 cup all-purpose flour

Pinch of salt

1/2 cup mini chocolate chips

For the chocolate layer:

4 ounces good-quality semisweet or bittersweet chocolate, roughly chopped

1 tablespoon unsalted butter

Directions:

Preheat oven to 350 degrees F. Grease an 8″x8″ glass baking pan and set aside.

Make the shortbread: Using an electric mixer, beat together the butter and sugar until light and fluffy, about 2-3 minutes. Beat in the vanilla, then slowly mix in the flour and salt until combined. Mixture will be crumbly. Firmly press the dough into the prepared pan. Poke shallow holes all over the pan using a fork or a toothpick. Bake the shortbread for 18-22 minutes or until edges are lightly browned. Remove from the oven and set on a wire rack.

Make the caramel: Place the unwrapped caramels and heavy cream into a small saucepan. Cook over medium heat, stirring constantly, until the caramels are completely melted. Pour the hot caramel over the warm shortbread crust, spreading it evenly. Refrigerate for 30-60 minutes or until the caramel is set.

Make the cookie dough: Using an electric mixer, beat together the butter and sugars until light and fluffy, about 2-3 minutes. Beat in the vanilla and heavy cream, scraping down the bowl as needed. Stir in the flour and salt until just combined, then stir in the chocolate chips. Spoon the cookie dough onto the chilled bars and spread evenly. Refrigerate the bars while making the chocolate layer.

Make the chocolate layer: Place the semisweet chocolate and butter into a microwave-safe bowl. Microwave for 30-second increments on 50% power, stirring in between, until chocolate is smooth and melted. Pour the chocolate over the bars, spreading evenly.

Refrigerate the bars for an additional 30 minutes or until chocolate is set. Using a sharp knife, cut into bars. The bars can be stored in an airtight container at room temperature for several days.

(Recipe adapted from Brown Eyed Baker, originally from The Cookie Dough Lover’s Cookbook)
Vanilla Funfetti Cake with Milk Chocolate Frosting

IMG_3793It’s amazing how much my baking has evolved over the years. Neither of my parents were all that into baking, aside from homemade teething cookies when I was a baby and the occasional batch of muffins, so most of what I do is self-taught. When I first started baking at around the age of 5, I was just learning how to read. I could usually decipher the list of ingredients but the directions down below were more intimidating. I guess that’s why my strategy was to just mix everything together.

I cringe at remembering how I used to make cookies. I would stir together all the dry ingredients (including sugar), “cut in” the cold butter, and then stir in eggs, vanilla, and whatever else the recipe called for. There was absolutely no creaming of the butter and sugar; no making sure that all the ingredients were at room-temperature so everything would bind, spread, and rise correctly; absolutely no regard for the fact that over-mixing flour breaks down gluten and makes baked goods tough. Somehow they still turned out tasty more often that not, but sometimes my cookies were either over-baked little rock mounds or flat, greasy pancake cookies.

One day my aunt and uncle came to visit when I was about six, and I decided to make brownies for them. Unfortunately, the recipe used chocolate chips for the chocolate component, which needed to be melted first (as any fool might guess!). Of course this step happened to be mentioned in the instructions, and following my usual pattern of simply reading off the ingredients I just stirred the chocolate chips in with everything else. Let’s just say those brownies were on the crumbly side and had a lot, like A LOT of chocolate chips! Luckily my sweet six-year-old face saved me and everyone smiled and said they were delicious.

For a few years I went through a cake-baking stage. I loved coming up with any possible excuse to bake a cake, whether it was the birthday of a teacher or an overlooked holiday or just because I felt like it. I had so much fun coming up with different combinations of cake and frosting and practicing my decorating skills. The only problem (aside from the fact that baking a 2-layer cake on a whim for a four-person family leaves a LOT of leftovers) was that I almost exclusively used boxed mixes and canned frosting. Cheap, shameful, chemical-ridden, artery-clogging, blood-sugar-spiking, can’t-even-call-it-food cake mix and canned frosting. No offense though, if you happen to be a fan.

In all honesty, I see nothing wrong with baking from a prepared mix or using processed frosting now and then, especially in a time crunch, but now that I’ve become a baking snob I like to make as much as I can from scratch. That way I know what goes into what I’m making and there’s nothing in there that I can’t pronounce (with a few exceptions…xanthan gum?) Haha. My point is that if it’s at all possible, homemade is almost always better. As good as boxed cakes taste, I find that homemade ones taste even better, AND they’re better for you. Minus all the sugar, fat, and white flour. Ahem.

One of my favorite types of cakes is funfetti. I had always made it from a box until now. This recipe for homemade funfetti cake tastes just as delicious as the real thing….actually even more so! It’s full of sweet sprinkles, has a moist crumb, and is packed with vanilla flavor that comes from actual vanilla, none of that artificial junk. The recipe yields just one 9-inch cake, which I find to be perfect for small gatherings or feeding a small family, but if you’d prefer a 2-layer cake just double the recipe. Easy peasy. Paired with milk chocolate frosting this cake offered a wonderful combination of chocolate and vanilla, but frost it with whatever you like. Just not frosting from a plastic container ;).

The next time you’re about to reach for a boxed cake mix, stop! This cake is made with everyday ingredients and is still extremely fast and easy…you don’t even have to break out an electric mixer! It tastes even better than boxed cake since it’s made with butter rather than oil, yogurt for moisture, and pure vanilla, and will be sure to please any and all funfetti-lovers. The milk chocolate frosting is smooth, chocolatey, and not too sweet….the perfect accompaniment.

IMG_3798

Even my six-year-old baking self could bake this delicious cake, since you basically just stir everything together. The whole process is really a piece of cake. Sorry, but did you really think I could write an entire cake-related post without using at least one cake cliche? I mean, really. 🙂

Vanilla Funfetti Cake

1 & 2/3 cups all-purpose flour

1/2 tsp baking powder

1/4 tsp baking soda

1/2 tsp salt

1/2 cup (1 stick) unsalted butter, melted

3/4 cup granulated sugar

1/4 cup light brown sugar, slightly packed

1 large egg

3/4 cup milk

1/4 cup plain yogurt

1 Tbs pure vanilla extract

2/3 cup multicolored sprinkles (about 2 small containers’ worth)

Directions:

Preheat oven to 350 degrees F. Grease and flour a 9″ round cake pan.

In a medium bowl, whisk together the flour, baking powder, baking soda, and salt. Set aside.

In a large bowl, whisk together the melted butter and sugars until smooth. Whisk in the egg, milk, yogurt, and vanilla until well-combined. Gradually stir in the flour mixture, stirring until smooth. Using a rubber spatula, fold in the sprinkles, mixing just until incorporated.

Pour the batter into the prepared cake pan, smoothing the top with a spatula. Bake for 30-35 minutes, or until an inserted toothpick comes out clean. Let the cake cool in its pan for 20 minutes before removing to a cooling rack. Cool the cake completely before frosting.

(Recipe adapted from Sally’s Baking Addiction)

Milk Chocolate Frosting

Yield: enough frosting for one 9-inch round cake (double the recipe to frost a 2-layer cake)

1/4 cup (half a stick) of butter, softened to room temperature

1-2 cups powdered sugar

1/2 tsp vanilla extract

2 Tbs unsweetened cocoa powder

2 Tbs heavy cream or milk

Directions:

Using an electric mixer, beat the butter until it’s smooth and creamy. Add in 1 cup of powdered sugar and mix until combined. Add in the cocoa powder, vanilla, and cream, scraping down the bowl with a spatula as you mix. Gradually add in additional powdered sugar until desired consistency is reached. If the frosting gets too thick, add in a little extra cream or milk.

Beat the frosting for 2-3 minutes or until fluffy. Spread onto cake, cupcakes, or cookies.